Chapter 9: Post-Processing Utilities
Table of Contents
·
NCL
· RIP4
· ARWpost
· UPP
·
VAPOR
Introduction
There are a number of visualization tools available to display WRF-ARW (http://wrf-model.org/) model data. Model data in netCDF format, can essentially be displayed using any tool capable of displaying this data format.
Currently the following post-processing utilities are supported: NCL, RIP4, ARWpost (converter to GrADS), WPP, and VAPOR.
NCL, RIP4, ARWpost and VAPOR can currently only read data in netCDF format, while WPP can read data in netCDF and binary format.
Required software
The only library that is always required is the netCDF package from Unidata (http://www.unidata.ucar.edu/: login > Downloads > NetCDF - registration login required).
netCDF stands for Network
Common Data Form. This format
is platform independent, i.e., data files can be read on both big-endian and
little-endian computers, regardless of where the file was created. To use the
netCDF libraries, ensure that the paths to these libraries are set correct in
your login scripts as well as all Makefiles.
Additional libraries required by each of the supported post-processing packages:
· NCL (http://www.ncl.ucar.edu)
· GrADS (http://grads.iges.org/home.html)
·
GEMPAK
(http://www.unidata.ucar.edu/software/gempak/)
·
VAPOR
(http://www.vapor.ucar.edu)
NCL
With the use of NCL Libraries (http://www.ncl.ucar.edu), WRF-ARW data can easily be displayed.
The information on these pages has been put together to help users generate NCL scripts to display their WRF-ARW model data.
Some example scripts are available online (http://www2.mmm.ucar.edu/wrf/OnLineTutorial/Graphics/NCL/NCL_examples.htm), but in order to fully utilize the functionality of the NCL Libraries, users should adapt these for their own needs, or write their own scripts.
NCL can process WRF-ARW static, input and output files, as well as WRFDA output data. Both single and double precision data can be processed.
WRF and NCL
In July 2007, the WRF-NCL processing scripts have been incorporated into the NCL Libraries, thus only the NCL Libraries are now needed.
Major WRF-ARW-related
upgrades have been added to the NCL libraries in version 6.1.0; therefore, in
order to use many of the functions, NCL version 6.1.0 or higher is required.
Special functions are provided to simplify the plotting of WRF-ARW data.
These functions are located in
"$NCARG_ROOT/lib/ncarg/nclscripts/wrf/WRFUserARW.ncl".
Users are encouraged to view and edit
this file for their own needs. If users wish to edit this file, but do not have
write permission, they should simply copy the file to a local directory, edit
and load the new version, when running NCL scripts.
Special NCL built-in functions have been added to the NCL libraries to help users calculate basic diagnostics for WRF-ARW data.
All the FORTRAN subroutines used for diagnostics and interpolation (previously located in wrf_user_fortran_util_0.f) has been re-coded into NCL in-line functions. This means users no longer need to compile these routines.
What is NCL
The NCAR Command Language (NCL) is a free, interpreted language designed specifically for scientific data processing and visualization. NCL has robust file input and output. It can read in netCDF, HDF4, HDF4-EOS, GRIB, binary and ASCII data. The graphics are world-class and highly customizable.
It runs on many different operating systems including
Solaris, AIX, IRIX, Linux, MacOSX, Dec Alpha, and Cygwin/X running on Windows.
The NCL binaries are freely available at:
http://www.ncl.ucar.edu/Download/
To read more about NCL, visit: http://www.ncl.ucar.edu/overview.shtml
Necessary software
NCL libraries, version
6.1.0 or higher.
Environment Variable
Set the environment variable NCARG_ROOT to the location where you installed the NCL libraries. Typically (for cshrc shell):
setenv NCARG_ROOT /usr/local/ncl
.hluresfile
Create a file called .hluresfile
in your $HOME directory. This file controls the color, background, fonts, and
basic size of your plot. For more information regarding this file, see: http://www.ncl.ucar.edu/Document/Graphics/hlures.shtml.
NOTE: This file must reside in your $HOME
directory and not where you plan on running NCL.
Below is the .hluresfile
used in the example scripts posted on the web (scripts are available at: http://www2.mmm.ucar.edu/wrf/users/graphics/NCL/NCL.htm).
If a different color table is used, the plots will appear different. Copy the
following to your ~/.hluresfile. (A copy of this file is available at: http://www2.mmm.ucar.edu/wrf/OnLineTutorial/Graphics/NCL/NCL_basics.htm)
*wkColorMap
: BlAqGrYeOrReVi200
*wkBackgroundColor
: white
*wkForegroundColor
: black
*FuncCode
: ~
*TextFuncCode
: ~
*Font
: helvetica
*wkWidth
: 900
*wkHeight
: 900
NOTE:
If your image has a black background with white lettering, your .hluresfile has not been created correctly, or it is in the wrong location.
wkColorMap, as set in your .hluresfile can be overwritten in any NCL script with the use of
the function “gsn_define_colormap”,
so you do not need to change your .hluresfile
if you just want to change the color map for a single plot.
Create NCL scripts
The basic outline of any NCL
script will look as follows:
|
load external functions and procedures begin ; Open input file(s) ; Open graphical output ; Read variables ; Set up plot resources & Create plots ; Output graphics end |
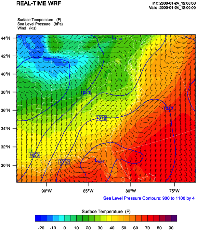
For example, let’s create a script to plot Surface Temperature, Sea Level Pressure and Wind as shown in the picture below.
|
; load functions and procedures load
"$NCARG_ROOT/lib/ncarg/nclscripts/csm/gsn_code.ncl" load
"$NCARG_ROOT/lib/ncarg/nclscripts/wrf/WRFUserARW.ncl" begin ; WRF ARW
input file (NOTE, your wrfout file does not need ; Output on screen. Output will be
called "plt_Surface1" type =
"x11" wks =
gsn_open_wks(type,"plt_Surface1") ; Set basic resources res = True res@MainTitle
= "REAL-TIME WRF" ; Give plot a main title res@Footer
= False ; Set Footers off ;---------------------------------------------------------------
times = wrf_user_getvar(a,"times",-1)) ;
get times in the file it = 0 ; only interested in first time res@TimeLabel
= times(it) ; keep some time information
;--------------------------------------------------------------- ; Get variables slp =
wrf_user_getvar(a,"slp",it) Get slp wrf_smooth_2d( slp, 3 ) ;
Smooth slp tc2
= t2-273.16
; Convert to deg C tf2
= 1.8*tc2+32.
; Convert to deg F
tf2@description = "Surface Temperature"
tf2@units = "F" u10 =
wrf_user_getvar(a,"U10",it) ; Get U10 v10 =
wrf_user_getvar(a,"V10",it) ; Get V10 u10
= u10*1.94386
; Convert to knots v10
= v10*1.94386
u10@units = "kts"
v10@units = "kts" ;---------------------------------------------------------------
opts =
res ; Add basic resources opts@cnFillOn
= True ; Shaded plot opts@ContourParameters
= (/ -20., 90., 5./) ; Contour intervals opts@gsnSpreadColorEnd
= -3 contour_tc
= wrf_contour(a,wks,tf2,opts)
; Create plot delete(opts)
; Plotting options for SLP opts =
res ;
Add basic resources opts@cnLineColor
= "Blue"
; Set line color opts@cnHighLabelsOn
= True ; Set labels opts@cnLowLabelsOn
= True opts@ContourParameters
= (/ 900.,1100.,4./) ; Contour intervals contour_psl
= wrf_contour(a,wks,slp,opts)
; Create plot delete(opts) ; Plotting options for Wind Vectors opts =
res ; Add basic resources opts@FieldTitle
= "Winds" ; Overwrite the field title opts@NumVectors
= 47 ; Density of wind barbs vector =
wrf_vector(a,wks,u10,v10,opts)
; Create plot delete(opts) ; MAKE PLOTS plot =
wrf_map_overlays(a,wks, \ ;--------------------------------------------------------------- end |
Extra sample scripts are available at, http://www2.mmm.ucar.edu/wrf/OnLineTutorial/Graphics/NCL/NCL_examples.htm
Run NCL scripts
1. Ensure
NCL is successfully installed on your computer.
2. Ensure
that the environment variable NCARG_ROOT is set to the location where NCL is
installed on your computer. Typically (for
cshrc shell), the command will look as follows:
setenv NCARG_ROOT /usr/local/ncl
3. Create an NCL plotting script.
4. Run the NCL script you created:
ncl NCL_script
The output type created with this command is controlled by the line:
wks
= gsn_open_wk (type,"Output")
; inside the NCL script
where type can be x11, pdf, ncgm, ps, or eps
For high quality images, create pdf , ps, or eps images
directly via the ncl scripts (type = pdf / ps / eps)
See the Tools section in Chapter 10 of this User’s Guide for more information concerning other types of graphical formats and conversions between graphical formats.
Functions / Procedures under "$NCARG_ROOT/lib/ncarg/nclscripts/wrf/" (WRFUserARW.ncl)
wrf_user_getvar (nc_file, fld, it)
Usage: ter = wrf_user_getvar
(a, “HGT”, 0)
Get fields from a netCDF file for:
· Any given time by setting it to the time required.
· For all times in the input file(s), by setting it = -1
· A list of times from the input file(s), by setting it to (/start_time,end_time,interval/) ( e.g. (/0,10,2/) ).
· A list of times from the input file(s), by setting it to the list required ( e.g. (/1,3,7,10/) ).
Any field available in the netCDF file can be extracted.
fld is case sensitive. The policy adapted during development was to set all diagnostic variables, calculated by NCL, to lower-case to distinguish them from fields directly available from the netCDF files.
List of available diagnostics:
|
avo |
Absolute Vorticity [10-5 s-1] |
|
pvo |
Potential Vorticity [PVU] |
|
eth |
Equivalent PotentialTtemperature [K] |
|
cape_2d |
Returns 2D fields mcape/mcin/lcl/lfc |
|
cape_3d |
Returns 3D fields cape/cin |
|
dbz |
Reflectivity [dBZ] |
|
mdbz |
Maximum Reflectivity [dBZ] |
|
geopt/geopotential |
Full Model Geopotential [m2 s-2] |
|
helicity |
Storm Relative Helicity [m-2/s-2] |
|
updraft_helicity |
Updraft Helicity [m-2/s-2] |
|
lat |
Latitude (will return either XLAT or XLAT_M,
|
|
lon |
Longitude (will return either XLONG or
XLONG_M, |
|
p/pres |
Full Model Pressure [Pa] |
|
pressure |
Full Model Pressure [hPa] |
|
pw |
Precipitable Water |
|
rh2 |
2m Relative Humidity [%] |
|
rh |
Relative Humidity [%] |
|
slp |
Sea Level Pressure [hPa] |
|
ter |
Model Terrain Height [m] (will return either
HGT or HGT_M, |
|
td2 |
2m Dew Point Temperature [C] |
|
td |
Dew Point Temperature [C] |
|
tc |
Temperature [C] |
|
tk |
Temperature [K] |
|
th/theta |
Potential Temperature [K] |
|
times |
Times in file (note this return strings - recommended) |
|
Times |
Times in file (note this return characters) |
|
ua |
U component of wind on mass points |
|
va |
V component of wind on mass points |
|
wa |
W component of wind on mass points |
|
uvmet10 |
10m U and V components of wind rotated to
earth coordinates |
|
uvmet |
U and V components of wind rotated to earth
coordinates |
|
z/height |
Full Model Height [m] |
wrf_user_list_times (nc_file)
Usage: times = wrf_user_list_times (a)
Obtain a list of times available in the input file. The
function returns a 1D array containing the times (type: character) in the input file.
This is an outdated function – best to use wrf_user_getvar(nc_file,”times”,it)
wrf_contour (nc_file, wks, data, res)
Usage: contour = wrf_contour (a, wks, ter, opts)
Returns a graphic (contour), of the data to be contoured. This graphic is only created, but not plotted to a wks. This enables a user to generate many such graphics and overlay them, before plotting the resulting picture to a wks.
The returned graphic (contour) does not contain map information, and can therefore be used for both real and idealized data cases.
This function can plot both line contours and shaded
contours. Default is line contours.
Many resources are set for a user, and most can be overwritten. Below is a list of resources you may want to consider changing before generating your own graphics:
Resources unique to
ARW WRF Model data
opts@MainTitle : Controls main title on the plot.
opts@MainTitlePos : Main title position – Left/Right/Center. Default is Left.
opts@NoHeaderFooter : Switch off all Headers and Footers.
opts@Footer : Add some model information to the plot as a footer. Default is True.
opts@InitTime : Plot initial time on graphic. Default is True. If True, the initial time will be extracted from the input file.
opts@ValidTime : Plot valid time on graphic. Default is True. A user must set opts@TimeLabel to the correct time.
opts@TimeLabel : Time to plot as valid time.
opts@TimePos : Time position – Left/Right. Default is “Right”.
opts@ContourParameters : A single value is treated as an interval. Three values represent: Start, End, and Interval.
opts@FieldTitle : Overwrite the field title - if not set the field description is used for the title.
opts@UnitLabel : Overwrite the field units - seldom needed as the units associated with the field will be used.
opts@PlotLevelID : Use to add level information to the field title.
General NCL resources
(most standard NCL options for cn and lb
can be set by the user to overwrite the default values)
opts@cnFillOn : Set to True for shaded plots. Default is False.
opts@cnLineColor : Color of line plot.
opts@lbTitleOn : Set to False to switch the title on the label bar off. Default is True.
opts@cnLevelSelectionMode ; opts @cnLevels ; opts@cnFillColors ; optr@cnConstFLabelOn : Can be used to set contour levels and colors manually.
wrf_vector (nc_file, wks, data_u, data_v, res)
Usage: vector = wrf_vector (a, wks, ua, va, opts)
Returns a graphic (vector) of the data. This graphic is only created, but not plotted to a wks. This enables a user to generate many graphics, and overlay them, before plotting the resulting picture to a wks.
The returned graphic (vector) does not contain map information, and can therefore be used for both real and idealized data cases.
Many resources are set for a user, and most can be overwritten. Below is a list of resources you may want to consider changing before generating your own graphics:
Resources unique to
ARW WRF Model data
opts@MainTitle : Controls main title on the plot.
opts@MainTitlePos : Main title position – Left/Right/Center. Default is Left.
opts@NoHeaderFooter : Switch off all Headers and Footers.
opts@Footer : Add some model information to the plot as a footer. Default is True.
opts@InitTime : Plot initial time on graphic. Default is True. If True, the initial time will be extracted from the input file.
opts@ValidTime : Plot valid time on graphic. Default is True. A user must set opts@TimeLabel to the correct time.
opts@TimeLabel : Time to plot as valid time.
opts@TimePos : Time position – Left/Right. Default is “Right”.
opts@ContourParameters : A single value is treated as an interval. Three values represent: Start, End, and Interval.
opts@FieldTitle : Overwrite the field title - if not set the field description is used for the title.
opts@UnitLabel : Overwrite the field units - seldom needed as the units associated with the field will be used.
opts@PlotLevelID : Use to add level information to the field title.
opts@NumVectors : Density of wind vectors.
General NCL resources
(most standard NCL options for vc can be
set by the user to overwrite the default values)
opts@vcGlyphStyle : Wind style. “WindBarb” is default.
wrf_map_overlays (nc_file, wks, (/graphics/), pltres, mpres)
Usage: plot = wrf_map_overlays (a, wks, (/contour,vector/), pltres, mpres)
Overlay contour and vector plots generated with wrf_contour and wrf_vector. Can overlay any number of graphics. Overlays will be done in the order given, so always list shaded plots before line or vector plots, to ensure the lines and vectors are visible and not hidden behind the shaded plot.
A map background will automatically be added to the plot. Map details are controlled with the mpres resource. Common map resources you may want to set are:
mpres@mpGeophysicalLineColor ; mpres@mpNationalLineColor ; mpres@mpUSStateLineColor ; mpres@mpGridLineColor ; mpres@mpLimbLineColor ; mpres@mpPerimLineColor
If you want to zoom into the plot, set mpres@ZoomIn to True, and mpres@Xstart, mpres@Xend, mpres@Ystart, and mpres@Yend to the corner x/y positions of the zoomed plot.
pltres@NoTitles : Set to True to remove all field titles on a plot.
pltres@CommonTitle : Overwrite field titles with a common title for the overlaid plots. Must set pltres@PlotTitle to desired new plot title.
If you want to generate images for a panel plot, set pltres@PanelPot to True.
If you want to add text/lines to the plot before advancing the frame, set pltres@FramePlot to False. Add your text/lines directly after the call to the wrf_map_overlays function. Once you are done adding text/lines, advance the frame with the command “frame (wks)”.
wrf_overlays
(nc_file, wks, (/graphics/), pltres)
Usage: plot = wrf_overlays (a, wks, (/contour,vector/), pltres)
Overlay contour and vector plots generated with wrf_contour and wrf_vector. Can overlay any number of graphics. Overlays will be done in the order given, so always list shaded plots before line or vector plots, to ensure the lines and vectors are visible and not hidden behind the shaded plot.
Typically used for idealized data or cross-sections, which does not have map background information.
pltres@NoTitles : Set to True to remove all field titles on a plot.
pltres@CommonTitle : Overwrite field titles with a common title for the overlaid plots. Must set pltres@PlotTitle to desired new plot title.
If you want to generate images for a panel plot, set pltres@PanelPot to True.
If you want to add text/lines to the plot before advancing the frame, set pltres@FramePlot to False. Add your text/lines directly after the call to the wrf_overlays function. Once you are done adding text/lines, advance the frame with the command “frame (wks)”.
wrf_map (nc_file, wks, res)
Usage: map = wrf_map (a, wks, opts)
Create a map background.
As maps are added to plots automatically via the wrf_map_overlays function, this function is seldom needed as a stand-alone.
wrf_user_intrp3d (var3d, H,
plot_type, loc_param, angle, res)
This function is used for both horizontal and vertical interpolation.
var3d: The variable to interpolate. This can be an array of up to 5 dimensions. The 3 right-most dimensions must be bottom_top x south_north x west_east.
H: The field to interpolate to. Either pressure (hPa or Pa), or z (m). Dimensionality must match var3d.
plot_type: “h” for horizontally- and “v” for vertically-interpolated plots.
loc_param: Can be a scalar, or an array, holding either 2 or 4 values.
For plot_type = “h”:
This is a scalar representing the level to interpolate to.
Must match the field to interpolate to (H).
When interpolating to pressure,
this can be in hPa or Pa (e.g. 500., to
interpolate to 500 hPa). When interpolating to height this must in in m (e.g. 2000., to interpolate to 2 km).
For plot_type = “v”:
This can be a pivot point though which a line is drawn – in this case a single x/y point (2 values) is required. Or this can be a set of x/y points (4 values), indicating start x/y and end x/y locations for the cross-section.
angle:
Set to 0., for plot_type = “h”, or for plot_type = “v” when start and end locations of cross-section are supplied in loc_param.
If a single pivot point was supplied in loc_param, angle is the angle of the line that will pass through the pivot point. Where: 0. is SN, and 90. is WE.
res:
Set to False for plot_type = “h”, or for plot_type = “v” when a single pivot point is supplied. Set to True if start and end locations are supplied.
wrf_user_intrp2d (var2d, loc_param, angle, res)
This function interpolates a 2D field along a given line.
var2d: The 2D field to interpolate. This can be an array of up to 3 dimensions. The 2 right-most dimensions must be south_north x west_east.
loc_param:
An array holding either 2 or 4 values.
This can be a pivot point though which a line is drawn - in this case a single x/y point (2 values) is required. Or this can be a set of x/y points (4 values), indicating start x/y and end x/y locations for the cross-section.
angle:
Set to 0 when start and end locations of the line are supplied in loc_param.
If a single pivot point is supplied in loc_param, angle is the angle of the line that will pass through the pivot point. Where: 0. is SN, and 90. is WE.
res:
Set to False when a single pivot point is supplied. Set to True if start and end locations are supplied.
wrf_user_ll_to_ij (nc_file, lons, lats, res)
Usage: loc = wrf_user_latlon_to_ij (a, 100., 40., res)
Usage: loc = wrf_user_latlon_to_ij (a, (/100.,
120./), (/40., 50./), res)
Converts a lon/lat location to the nearest x/y location. This function makes use of map information to find the closest point; therefore this returned value may potentially be outside the model domain.
lons/lats can be scalars or arrays.
Optional resources:
res@returnInt - If set to False, the return values will be real (default is True with integer return values)
res@useTime - Default is 0. Set if you want the reference longitude/latitudes to come from a specific time - one will only use this for moving nest output, which has been stored in a single file.
loc(0,:) is the x (WE) locations, and loc(1,:) the y (SN) locations.
wrf_user_ij_to_ll (nc_file,
i, j, res)
Usage: loc = wrf_user_latlon_to_ij (a, 10, 40, res)
Usage: loc = wrf_user_latlon_to_ij (a, (/10, 12/), (/40, 50/), res)
Convert an i/j location to a lon/lat location. This function makes use of map information to find the closest point, so this returned value may potentially be outside the model domain.
i/j can be scalars or arrays.
Optional resources:
res@useTime - Default is 0. Set if you want the reference longitude/latitudes to come from a specific time - one will only use this for moving nest output, which has been stored in a single file.
loc(0,:) is the lons locations, and loc(1,:) the lats locations.
wrf_user_unstagger
(varin, unstagDim)
This function unstaggers an array, and returns an array on ARW WRF mass points.
varin: Array to be unstaggered.
unstagDim: Dimension to unstagger. Must be either "X", "Y", or "Z". This is case sensitive. If you do not use one of these strings, the returning array will be unchanged.
wrf_wps_dom (wks,
mpres, lnres, txres)
A function has been built into NCL to preview where a potential domain will be placed (similar to plotgrids.exe from WPS).
The lnres and txres resources are standard NCL Line and Text resources. These are used to add nests to the preview.
The mpres are used for standard map background resources like:
mpres@mpFillOn
; mpres@mpFillColors ; mpres@mpGeophysicalLineColor ; mpres@mpNationalLineColor
; mpres@mpUSStateLineColor ; mpres@mpGridLineColor ; mpres@mpLimbLineColor ;
mpres@mpPerimLineColor
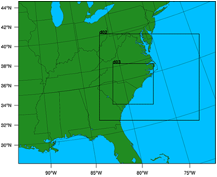
Its main function, however, is to set map resources to preview a domain. These resources are similar to the resources set in WPS. Below is an example of how to display 3 nested domains on a Lambert projection. (The output is shown below).
mpres@max_dom = 3
mpres@parent_id = (/ 1, 1, 2 /)
mpres@parent_grid_ratio = (/ 1, 3, 3 /)
mpres@i_parent_start = (/ 1, 31, 15 /)
mpres@j_parent_start = (/ 1, 17, 20 /)
mpres@e_we = (/ 74, 112, 133/)
mpres@e_sn = (/ 61, 97, 133 /)
mpres@dx = 30000.
mpres@dy = 30000.
mpres@map_proj = "lambert"
mpres@ref_lat = 34.83
mpres@ref_lon = -81.03
mpres@truelat1 = 30.0
mpres@truelat2 = 60.0
mpres@stand_lon = -98.0
A number of NCL built-in functions have been created to help users calculate simple diagnostics. Full descriptions of these functions are available on the NCL web site (http://www.ncl.ucar.edu/Document/Functions/wrf.shtml).
|
wrf_avo |
Calculates absolute
vorticity. |
|
wrf_cape_2d |
Computes convective
available potential energy (CAPE), convective inhibition (CIN), lifted
condensation level (LCL), and level of free convection (LFC). |
|
wrf_cape_3d |
Computes convective
available potential energy (CAPE) and convective inhibition (CIN). |
|
wrf_dbz |
Calculates the
equivalent reflectivity factor. |
|
wrf_eth |
Calculates
equivalent potential temperature |
|
wrf_helicity |
Calculates storm
relative helicity |
|
wrf_ij_to_ll |
Finds the longitude,
latitude locations to the specified model grid indices (i,j). |
|
wrf_ll_to_ij |
Finds the model grid
indices (i,j) to the specified location(s) in longitude and latitude. |
|
wrf_pvo |
Calculates potential
vorticity. |
|
wrf_rh |
Calculates relative
humidity. |
|
wrf_slp |
Calculates sea level
pressure. |
|
wrf_smooth_2d |
Smooth a given
field. |
|
wrf_td |
Calculates dewpoint
temperature in [C]. |
|
wrf_tk |
Calculates
temperature in [K]. |
|
wrf_updraft_helicity |
Calculates updraft
helicity |
|
wrf_uvmet |
Rotates u,v
components of the wind to earth coordinates. |
Adding diagnostics using FORTRAN code
It is possible to link your favorite FORTRAN diagnostics routines to NCL. It is easier to use FORTRAN 77 code, but NCL also recognizes basic FORTRAN 90 code.
Let’s use a routine that calculates temperature (K) from theta and pressure.
|
FORTRAN 90 routine
called myTK.f90 |
|
subroutine compute_tk (tk, pressure, theta, nx, ny, nz) !! Variables integer
:: nx, ny, nz real, dimension (nx,ny,nz) :: tk, pressure, theta !! Local Variables integer :: i, j, k |
For simple routines like this, it is easiest to re-write the routine into a FORTRAN 77 routine.
|
FORTRAN 77 routine
called myTK.f |
|
subroutine compute_tk (tk, pressure, theta, nx, ny, nz) C Variables
integer nx, ny, nz real tk(nx,ny,nz) , pressure(nx,ny,nz), theta(nx,ny,nz) C Local Variables integer i, j, k DO k=1,nz ENDDO return |
Add the markers NCLFORTSTART and NCLEND to the subroutine as indicated below. Note, that local variables are outside these block markers.
|
FORTRAN 77 routine
called myTK.f, with NCL markers added |
|
C NCLFORTSTART subroutine compute_tk (tk, pressure, theta, nx, ny, nz) C Variables integer nx,
ny, nz real tk(nx,ny,nz) , pressure(nx,ny,nz), theta(nx,ny,nz) C NCLEND C Local Variables integer i, j, k DO k=1,nz ENDDO return |
Now compile this code using the NCL script WRAPIT.
WRAPIT
myTK.f
NOTE: If WRAPIT cannot be found, make sure the environment variable NCARG_ROOT has been set correctly.
If the subroutine compiles successfully, a new library will be created, called myTK.so. This library can be linked to an NCL script to calculate TK. See how this is done in the example below:
|
load
"$NCARG_ROOT/lib/ncarg/nclscripts/csm/gsn_code.ncl" load
"$NCARG_ROOT/lib/ncarg/nclscripts/wrf/WRFUserARW.ncl” begin t = wrf_user_getvar (a,”T”,5) p = wrf_user_getvar (a,”pressure”,5) dim = dimsizes(t) tk = new( (/ dim(0), dim(1), dim(2) /), float) myTK :: compute_tk (tk, p, theta,
dim(2), dim(1), dim(0)) end |
Want to use the FORTRAN 90 program? It is possible to do so by providing an interface block for your FORTRAN 90 program. Your FORTRAN 90 program may also not contain any of the following features:
- pointers or structures as arguments,
- missing/optional arguments,
- keyword arguments, or
- if the procedure is recursive.
|
Interface block for
FORTRAN 90 code, called myTK90.stub |
|
C NCLFORTSTART subroutine compute_tk (tk, pressure, theta, nx, ny, nz) integer nx,
ny, nz real tk(nx,ny,nz) , pressure(nx,ny,nz), theta(nx,ny,nz) C NCLEND |
Now compile this code using the NCL script WRAPIT.
WRAPIT
myTK90.stub myTK.f90
NOTE: You may need to copy the WRAPIT script to a locate location and edit it to point to a FORTRAN 90 compiler.
If the subroutine compiles successfully, a new library will be created, called myTK90.so (note the change in name from the FORTRAN 77 library). This library can similarly be linked to an NCL script to calculate TK. See how this is done in the example below:
|
load
"$NCARG_ROOT/lib/ncarg/nclscripts/csm/gsn_code.ncl" load
"$NCARG_ROOT/lib/ncarg/nclscripts/wrf/WRFUserARW.ncl” begin t = wrf_user_getvar (a,”T”,5) p = wrf_user_getvar (a,”pressure”,5) dim = dimsizes(t) tk = new( (/ dim(0),
dim(1), dim(2) /), float) myTK90 :: compute_tk
(tk, p, theta, dim(2), dim(1), dim(0)) end |
RIP4
RIP (which stands for Read/Interpolate/Plot)
is a Fortran program that invokes NCAR Graphics routines for the purpose of
visualizing output from gridded meteorological data sets, primarily from
mesoscale numerical models. It was originally designed for
sigma-coordinate-level output from the PSU/NCAR Mesoscale Model (MM4/MM5), but
was generalized in April 2003 to handle data sets with any vertical coordinate,
and in particular, output from the Weather Research and Forecast (WRF) modeling
system. It can also be used to visualize model input or analyses on model
grids. It has been under continuous development since 1991, primarily by Mark Stoelinga at both NCAR and
the University of Washington.
The RIP users' guide (http://www2.mmm.ucar.edu/wrf/users/docs/ripug.htm) is essential reading.
Code history
Version 4.0: reads WRF-ARW real output files
Version 4.1: reads idealized WRF-ARW datasets
Version 4.2: reads all the files produced by WPS
Version 4.3: reads files produced by WRF-NMM model
Version 4.4: add ability to output different graphical types
Version 4.5: add configure/compiler capabilities
Version 4.6: current version – only bug fix changes between
4.5 and 4.6
(This document will only concentrate on running
RIP4 for WRF-ARW. For details on running RIP4 for WRF-NMM, see the WRF-NMM
User’s Guide:
http://www.dtcenter.org/wrf-nmm/users/docs/overview.php)
Necessary software
RIP4 only
requires low-level NCAR Graphics libraries. These libraries have been merged
with the NCL libraries since the release of NCL version 5 (http://www.ncl.ucar.edu/),
so if you don’t already have NCAR Graphics installed on your computer, install
NCL version 5.
Obtain the code from the WRF-ARW user’s web site:
http://www2.mmm.ucar.edu/wrf/users/download/get_source.html
Unzip and untar the RIP4 tar file. The tar file contains the following
directories and files:
- CHANGES, a text file that logs changes to the RIP tar file.
- Doc/, a directory that contains documentation of RIP, most notably the Users' Guide (ripug).
- README, a text file containing basic information on running RIP.
- arch/, directory containing the default compiler flags for different machines.
- clean, script to clean compiled code.
- compile, script to compile code.
- configure, script to create a configure file for your machine.
- color.tbl, a file that contains a table, defining the colors you want to have available for RIP plots.
- eta_micro_lookup.dat, a file that contains "look-up" table data for the Ferrier microphysics scheme.
- psadilookup.dat, a file that contains "look-up" table data for obtaining temperature on a pseudoadiabat.
- sample_infiles/, a directory that contains sample user input files for RIP and related programs.
- src/, a directory that contains all of the source code files
for RIP, RIPDP, and several other utility programs.
- stationlist, a file containing observing station location
information.
Environment Variables
An important environment variable for the RIP system is RIP_ROOT.
RIP_ROOT should be assigned the path name of the directory where all your RIP
program and utility files (color.tbl,
stationlist, lookup tables, etc.)
reside.
Typically (for cshrc shell):
setenv RIP_ROOT /my-path/RIP4
The RIP_ROOT environment variable can also be overwritten with the variable rip_root in the RIP user input file (UIF).
A second environment variable you need to set is NCARG_ROOT.
Typically (for cshrc shell):
setenv NCARG_ROOT /usr/local/ncarg ! for NCARG V4
setenv NCARG_ROOT /usr/local/ncl !
for NCL V5
Compiling RIP and associated programs
Since the release of version 4.5, the same configure/compile scripts available in all other WRF programs have been added to RIP4. To compile the code, first configure for your machine by typing:
./configure
You will see a list of options for your computer (below is an example for a Linux machine):
Will
use NETCDF in dir: /usr/local/netcdf-pgi
-----------------------------------------------------------
Please select from among the following supported platforms.
1. PC Linux i486 i586 i686 x86_64, PGI
compiler
2. PC Linux i486 i586
i686 x86_64, g95 compiler
3. PC Linux i486 i586
i686 x86_64, gfortran compiler
4. PC Linux i486 i586
i686 x86_64, Intel compiler
Enter selection [1-4]
Make sure the netCDF path is correct.
Pick compile options for your machine.
This will create a file called configure.rip. Edit compile options/paths, if necessary.
To compile the code, type:
./compile
After a successful compilation, the following new files
should be created.
|
rip |
RIP post-processing program. |
|
ripcomp |
This program reads-in two rip data files and compares their content. |
|
ripdp_mm5 |
RIP Data Preparation program for MM5 data |
|
ripdp_wrfarw |
RIP Data Preparation program for WRF data |
|
ripinterp |
This program reads-in model output (in rip-format files) from a coarse domain and from a fine domain, and creates a new file which has the data from the coarse domain file interpolated (bi-linearly) to the fine domain. The header and data dimensions of the new file will be that of the fine domain, and the case name used in the file name will be the same as that of the fine domain file that was read-in. |
|
ripshow |
This program reads-in a rip data file and prints out the contents of the header record. |
|
showtraj |
Sometimes, you may want to examine the contents of a trajectory position file. Since it is a binary file, the trajectory position file cannot simply be printed out. showtraj, reads the trajectory position file and prints out its contents in a readable form. When you run showtraj, it prompts you for the name of the trajectory position file to be printed out. |
|
tabdiag |
If fields are specified in the plot specification table for a trajectory calculation run, then RIP produces a .diag file that contains values of those fields along the trajectories. This file is an unformatted Fortran file; so another program is required to view the diagnostics. tabdiag serves this purpose. |
|
upscale |
This program reads-in model output (in rip-format files) from a coarse domain and from a fine domain, and replaces the coarse data with fine data at overlapping points. Any refinement ratio is allowed, and the fine domain borders do not have to coincide with coarse domain grid points. |
Preparing data with RIPDP
RIP does not ingest model output files directly. First, a preprocessing step
must be executed that converts the model output data files to RIP-format data
files. The primary difference between these two types of files is that model
output data files typically contain all times and all variables in a single
file (or a few files), whereas RIP data has each variable at each time in a
separate file. The preprocessing step involves use of the program RIPDP (which
stands for RIP Data Preparation). RIPDP reads-in a model
output file (or files), and separates out each variable at each time.
Running RIPDP
The program has the following usage:
ripdp_XXX
[-n
namelist_file] model-data-set-name [basic|all]
data_file_1 data_file_2 data_file_3 ...
Above, the "XXX" refers to "mm5",
"wrfarw", or "wrfnmm".
The argument model-data-set-name can be any string you choose, that
uniquely defines this model output data set.
The use of the namelist file is optional. The most important
information in the namelist is the times you want to process.
As this step will create a large number of extra files,
creating a new directory to place these files in will enable you to manage the
files easier (mkdir RIPDP).
e.g. ripdp_wrfarw
RIPDP/arw all wrfout_d01_*
The RIP user input file
Once the RIP data has been created with RIPDP, the next step is to prepare the user input file (UIF) for RIP (see Chapter 4 of the RIP users’ guide for details). This file is a text file, which tells RIP what plots you want, and how they should be plotted. A sample UIF, called rip_sample.in, is provided in the RIP tar file. This sample can serve as a template for the many UIFs that you will eventually create.
A UIF is divided into two main sections. The first section specifies various general parameters about the set-up of RIP, in a namelist format (userin - which controls the general input specifications; and trajcalc - which controls the creation of trajectories). The second section is the plot specification section, which is used to specify which plots will be generated.
namelist: userin
|
Variable |
Value |
Description |
|
idotitle |
1 |
Controls first part of title. |
|
title |
‘auto’ |
Defines your own title, or allow RIP to generate one. |
|
titlecolor |
‘def.foreground’ |
Controls color of the title. |
|
iinittime |
1 |
Prints initial date and time (in UTC) on plot. |
|
ifcsttime |
1 |
Prints forecast lead-time (in hours) on plot. |
|
ivalidtime |
1 |
Prints valid date and time (in both UTC and local time) on plot. |
|
inearesth |
0 |
This allows you to have the hour portion of the initial and valid time be specified with two digits, rounded to the nearest hour, rather than the standard 4-digit HHMM specification. |
|
timezone |
-7.0 |
Specifies the offset from Greenwich time. |
|
iusdaylightrule |
1 |
Flag to determine if US daylight saving should be applied. |
|
ptimes |
9.0E+09 |
Times to process. |
|
ptimeunits |
‘h’ |
Time units. This can be ‘h’ (hours), ‘m’ (minutes), or ‘s’ (seconds). Only valid with ptimes. |
|
iptimes |
99999999 |
Times to process. This is an integer array that specifies desired times for RIP to plot, but in the form of 8-digit "mdate" times (i.e. YYMMDDHH). Either ptimes or iptimes can be used, but not both. You can plot all available times by omitting both ptimes and iptimes from the namelist, or by setting the first value negative. |
|
tacc |
1.0 |
Time tolerance in seconds. |
|
flmin, flmax, fbmin,
ftmax |
.05, .95, |
Left, right, |
|
ntextq |
0 |
Text quality specifier (0=high; 1=medium; 2=low). |
|
ntextcd |
0 |
Text font specifier [0=complex (Times); 1=duplex (Helvetica)]. |
|
fcoffset |
0.0 |
This is an optional parameter you can use to "tell" RIP that you consider the start of the forecast to be different from what is indicated by the forecast time recorded in the model output. Examples: fcoffset=12 means you consider hour 12 in the model output to be the beginning of the true forecast. |
|
idotser |
0 |
Generates time-series output files (no plots); only an ASCII file that can be used as input to a plotting program. |
|
idescriptive |
1 |
Uses more descriptive plot titles. |
|
icgmsplit |
0 |
Splits metacode into several files. |
|
maxfld |
10 |
Reserves memory for RIP. |
|
ittrajcalc |
0 |
Generates trajectory output files (use namelist trajcalc when this is set). |
|
imakev5d |
0 |
Generate output for Vis5D |
|
ncarg_type |
‘cgm’ |
Outputs type required. Options are ‘cgm’ (default), ‘ps’, ‘pdf’, ‘pdfL’, ‘x11’. Where ‘pdf’ is portrait and ‘pdfL’ is landscape. |
|
istopmiss |
1 |
This switch determines the behavior for RIP when a user-requested field is not available. The default is to stop. Setting the switch to 0 tells RIP to ignore the missing field and to continue plotting. |
|
rip_root |
‘/dev/null’ |
Overwrites the environment variable RIP_ROOT. |
Plot Specification
Table
The second part of the RIP UIF consists of the Plot Specification Table. The
PST provides all of the user control over particular aspects of individual
frames and overlays.
The basic structure of the PST is as follows:
· The first line of the PST is a line of consecutive equal signs. This line, as well as the next two lines, is ignored by RIP. It is simply a banner that says this is the start of the PST section.
· After that, there are several groups of one or more lines, separated by a full line of equal signs. Each group of lines is a frame specification group (FSG), and it describes what will be plotted in a single frame of metacode. Each FSG must end with a full line of equal signs, so that RIP can determine where individual frames start and end.
·
Each line within a FGS is referred to as a plot
specification line (PSL). An FSG that consists of three PSL lines will result
in a single metacode frame with three over-laid plots.
|
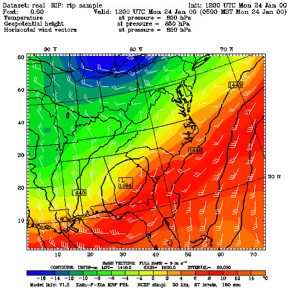
Example of a frame
specification groups (FSG's): ============================================== feld=tmc;
ptyp=hc; vcor=p; levs=850; >
cint=2; cmth=fill; cosq=-32,light.violet,-24,
16,orange,24,brown,32,light.gray
feld=ght; ptyp=hc; cint=30;
linw=2
feld=uuu,vvv; ptyp=hv; vcmx=-1; colr=white;
intv=5
feld=map; ptyp=hb
feld=tic; ptyp=hb _=============================================== |
This FSG will generate 5 frames to
create a single plot (as shown below):
· Temperature in degrees C (feld=tmc). This will be plotted as a horizontal contour plot (ptyp=hc), on pressure levels (vcor=p). The data will be interpolated to 850 hPa. The contour intervals are set to 2 (cint=2), and shaded plots (cmth=fill) will be generated with a color range from light violet to light gray.
· Geopotential heights (feld=ght) will also be plotted as a horizontal contour plot. This time the contour intervals will be 30 (cint=30), and contour lines with a line width of 2 (linw=2) will be used.
· Wind vectors (feld=uuu,vvv), plotted as barbs (vcmax=-1).
· A map background will be displayed (feld=map), and
· Tic marks will be placed on the plot (feld=tic).
Running RIP
Each execution of RIP requires three basic things: a RIP executable, a model data set and a user input file (UIF). The syntax for the executable, rip, is as follows:
rip [-f] model-data-set-name rip-execution-name
In the above, model-data-set-name is the same model-data-set-name that was used in creating the RIP data set with the program ripdp.
rip-execution-name is the unique name for this RIP execution, and it also defines the name of the UIF that RIP will look for.
The –f option causes the standard output (i.e., the textual print out) from RIP to be written to a file called rip-execution-name.out. Without the –f option, the standard output is sent to the screen.
e.g.
rip -f RIPDP/arw
rip_sample
If this is successful, the following files will be created:
rip_sample.TYPE - metacode file with requested plots
rip_sample.out -
log file (if –f used) ; view this file if a problem
occurred
The default output TYPE is a ‘cgm’, metacode file. To view these, use the command ‘idt’.
e.g. idt
rip_sample.cgm
For high quality images, create pdf or ps images directly (ncarg_type
= pdf / ps).
See the Tools section in Chapter 10 of this User’s Guide for more information concerning other types of graphical formats and conversions between graphical formats.
Examples of plots created for both idealized and real cases
are available from:
http://www2.mmm.ucar.edu/wrf/users/graphics/RIP4/RIP4.htm
ARWpost
The ARWpost package reads-in WRF-ARW model data and creates
GrADS output files. Since version 3.0
(released December 2010), vis5D output is no longer supported. More advanced 3D
visualization tools, like VAPOR and IDV, have been developed over the last
couple of years, and users are encouraged to explore those for their 3D
visualization needs.
The converter can read-in WPS geogrid and metgrid data, and WRF-ARW input and output files in netCDF format. Since version 3.0 the ARWpost code is no longer dependant on the WRF IO API. The advantage of this is that the ARWpost code can now be compiled and executed anywhere without the need to first install WRF. The disadvantage is that GRIB1 formatted WRF output files are no longer supported.
Necessary software
GrADS software - you can download and install GrADS from http://grads.iges.org/.
The GrADS software is not needed to compile and run ARWpost, but is needed to
display the output files.
Obtain the ARWpost TAR file from the WRF Download page (http://www2.mmm.ucar.edu/wrf/users/download/get_source.html)
Unzip and untar the ARWpost tar file.
The tar file contains the following directories and files:
- README, a text file containing basic information on running ARWpost.
- arch/, directory containing configure and compilation control.
- clean, a script to clean compiled code.
- compile, a script to compile the code.
- configure, a script to configure the compilation for your system.
- namelist.ARWpost, namelist to control the running of the code.
- src/, directory containing all source code.
- scripts/, directory containing some grads sample scripts.
- util/, a directory containing some
utilities.
Environment Variables
Set the environment variable NETCDF to the location where your netCDF libraries are installed. Typically (for cshrc shell):
setenv NETCDF /usr/local/netcdf
Configure and Compile ARWpost
To configure - Type:
./configure
You will see a list of options for your computer (below is an example for a Linux machine):
Will
use NETCDF in dir: /usr/local/netcdf-pgi
-----------------------------------------------------------
Please select from among the following supported platforms.
1. PC Linux i486 i586 i686, PGI compiler
2. PC Linux i486 i586 i686, Intel compiler
Enter selection [1-2]
Make sure the netCDF path is correct.
Pick the compile option for your machine
To compile - Type:
./compile
If successful, the executable ARWpost.exe will be created.
Edit the namelist.ARWpost file
Set input and output file names and fields to process (&io)
|
Variable |
Value |
Description |
|
|
||
|
start_date; end_date |
|
Start and end dates to process. |
|
interval_seconds |
0 |
Interval in seconds between data to process. If data is available every hour, and this is set to every 3 hours, the code will skip past data not required. |
|
tacc |
0 |
Time tolerance in seconds. |
|
debug_level |
0 |
Set this higher for more print-outs that can be useful for debugging later. |
|
|
||
|
input_root_name |
./ |
Path and root name of files to use as input. All files starting with the root name will be processed. Wild characters are allowed.
|
|
output_root_name |
./ |
Output root name. When converting data to GrADS, output_root_name.ctl and output_root_name.dat will be created.
|
|
output_title |
Title as in WRF file |
Use to overwrite title used in GrADS .ctl file. |
|
mercator_defs |
.False. |
Set to true if mercator plots are distorted. |
|
split_output |
.False. |
Use if you want to split our GrADS output files into a number of smaller files (a common .ctl file will be used for all .dat files). |
|
frames_per_outfile |
1 |
If split_output is .True., how many time periods are required per output (.dat) file. |
|
plot |
‘all’ |
Which fields to process. ‘list’ – only fields as listed in the ‘fields’ variable. ‘all_list’ – all fields in WRF file and all fields listed
in the ‘fields’ variable. |
|
fields |
|
Fields to plot. Only used if ‘list’ was used in the ‘plot’ variable. |
|
|
||
|
interp_method |
0 |
0 - sigma levels, -1 - code-defined "nice" height levels, 1 - user-defined height or pressure levels |
|
interp_levels |
|
Only used if interp_method=1
|
|
extrapolate |
.false. |
Extrapolate the data below the ground if interpolating to either pressure or height. |
Available diagnostics:
cape - 3d cape
cin - 3d cin
mcape - maximum cape
mcin - maximum cin
clfr - low/middle
and high cloud fraction
dbz - 3d reflectivity
max_dbz - maximum reflectivity
geopt -
geopotential
height - model height in km
lcl - lifting
condensation level
lfc - level of free convection
pressure - full model pressure in
hPa
rh - relative humidity
rh2 - 2m relative humidity
theta - potential temperature
tc - temperature in degrees C
tk - temperature in degrees K
td - dew point temperature in
degrees C
td2 - 2m dew point temperature in
degrees C
slp - sea level pressure
umet and vmet - winds rotated to earth
coordinates
u10m and v10m - 10m winds rotated to earth coordinates
wdir - wind direction
wspd - wind speed coordinates
wd10 - 10m wind direction
ws10 - 10m wind speed
Run ARWpost
Type:
./ARWpost.exe
This will create the output_root_name.dat and output_root_name.ctl files required as input by the GrADS visualization software.
NOW YOU ARE READY TO VIEW THE OUTPUT
For general information about working with GrADS, view the GrADS home page: http://grads.iges.org/grads/
To help users get started, a number of GrADS scripts have been provided:
· The scripts are all available in the scripts/ directory.
· The scripts provided are only examples of the type of plots one can generate with GrADS data.
· The user will need to modify these scripts to suit their data (e.g., if you do not specify 0.25 km and 2 km as levels to interpolate to when you run the "bwave" data through the converter, the "bwave.gs" script will not display any plots, since it will specifically look for these levels).
·
Scripts must be copied to the location of the
input data.
|
GENERAL SCRIPTS |
|
|
|
|
|
cbar.gs |
Plot color bar on shaded plots (from GrADS home page) |
|
rgbset.gs |
Some extra colors (Users can add/change colors from color number 20 to 99) |
|
skew.gs |
Program to plot a skewT |
|
plot_all.gs |
Once you have opened a GrADS window, all one needs to do is run this script. It will automatically find all .ctl files in the current directory and list them so one can pick which file to open. Then the script will loop through all available fields and plot the ones a user requests. |
|
SCRIPTS FOR REAL
DATA |
|
|
|
|
|
real_surf.gs |
Plot some surface data |
|
plevels.gs |
Plot some pressure level fields |
|
rain.gs |
Plot total rainfall |
|
cross_z.gs |
Need z level data as input |
|
zlevels.gs |
Plot some height level fields |
|
input.gs |
Need WRF INPUT data on height levels |
|
SCRIPTS FOR
IDEALIZED DATA |
|
|
|
|
|
bwave.gs |
Need height level data as input |
|
grav2d.gs |
Need normal model level data |
|
hill2d.gs |
Need normal model level data |
|
qss.gs |
Need height level data as input. |
|
sqx.gs |
Need normal model level data a input |
|
sqy.gs |
Need normal model level data a input |
Examples of plots created for both idealized and real cases
are available from:
http://www2.mmm.ucar.edu/wrf/OnLineTutorial/Graphics/ARWpost/
Trouble Shooting
The code executes correctly, but you get "NaN"
or "Undefined Grid" for
all fields
when displaying the data.
Look in the .ctl file.
a) If the second line is:
options
byteswapped
Remove this line from your .ctl file and try to display the data again.
If this SOLVES the problem, you need to remove the -Dbytesw option from configure.arwp
b) If the line below does NOT appear in your .ctl file:
options
byteswapped
ADD this line as the second line in the .ctl file.
Try to display the data again.
If this SOLVES the problem, you need to ADD the -Dbytesw option for configure.arwp
The line "options byteswapped" is often needed on some computers (DEC alpha as an example). It is also often needed if you run the converter on one computer and use another to display the data.
NCEP Unified Post
Processor (UPP)
UPP
Introduction
The NCEP
Unified Post Processor has replaced the WRF Post Processor (WPP). The
UPP software package is based on WPP but has enhanced capabilities to
post-process output from a variety of NWP models, including WRF-NMM, WRF-ARW, Non-hydrostatic
Multi-scale Model on the B grid (NMMB), Global Forecast System (GFS), and Climate Forecast System (CFS). At this time, community user support is
provided for the WRF-based systems only.
UPP interpolates output from the model’s native grids to National
Weather Service (NWS) standard levels (pressure, height, etc.) and standard
output grids (AWIPS, Lambert Conformal, polar-stereographic, etc.) in NWS and
World Meteorological Organization (WMO) GRIB format. There is also an option to
output fields on the model’s native vertical levels. In addition, UPP
incorporates the Joint Center for Satellite Data Assimilation (JCSDA) Community
Radiative Transfer Model (CRTM) to compute model derived brightness temperature
(TB) for various instruments and channels. This additional feature
enables the generation of simulated GOES and AMSRE
products for WRF-NMM, Hurricane WRF (HWRF), WRF-ARW and GFS. For CRTM documentation, refer to
http://www.orbit.nesdis.noaa.gov/smcd/spb/CRTM.
The
adaptation of the original WRF Post Processor package and User’s Guide (by Mike
Baldwin of NSSL/CIMMS and Hui-Ya Chuang of NCEP/EMC) was done by Lígia
Bernardet (NOAA/ESRL/DTC) in collaboration with Dusan Jovic (NCEP/EMC), Robert
Rozumalski (COMET), Wesley Ebisuzaki (NWS/HQTR), and Louisa Nance
(NCAR/RAL/DTC). Upgrades to WRF Post Processor versions 2.2 and higher were
performed by Hui-Ya Chuang, Dusan Jovic and Mathew Pyle (NCEP/EMC).
Transitioning of the documentation from the WRF Post Processor to the Unified
Post Processor was performed by Nicole McKee (NCEP/EMC), Hui-ya Chuang
(NCEP/EMC), and Jamie Wolff (NCAR/RAL/DTC). Implementation of the Community
Unified Post Processor was performed by Tricia Slovacek (NCAR/RAL/DTC).
UPP
Software Requirements
The Community Unified Post
Processor requires the same Fortran and C compilers used to build the
WRF model. In addition, the netCDF library and the WRF I/O API
libraries, which are included in the WRF model tar file, are also
required.
The UPP has some sample
visualization scripts included to create graphics using either GrADS (http://grads.iges.org/grads/grads.html) or GEMPAK (http://www.unidata.ucar.edu/software/gempak/index.html).
These are not part of the UPP installation and need to be installed
separately if one would like to use either plotting package.
The Unified Post Processor has been tested on IBM (with XLF
compiler) and LINUX platforms (with PGI, Intel and GFORTRAN compilers).
Obtaining the UPP Code
The Unified Post Processor package can be downloaded from: http://www.dtcenter.org/wrf-nmm/users/downloads/.
Note:
Always obtain the latest version of the code if you are not trying to
continue a pre-existing project. UPPV1
is just used as an example here.
Once the tar file is obtained, gunzip and untar the file.
tar
–zxvf UPPV1.tar.gz
This command
will create a directory called UPPV1.
UPP
Directory Structure
Under the main directory of UPPV1 reside seven subdirectories (*
indicates directories that are created after the configuration step):
arch: Machine dependent configuration build scripts used to construct configure.upp
bin*: Location of executables after
compilation.
scripts: contains sample running scripts
run_unipost: run unipost, ndate and copygb.
run_unipost andgempak: run unipost, copygb, and GEMPAK to
plot various fields.
run_unipost andgrads: run unipost, ndate,
copygb, and GrADS to plot various fields.
run_unipost _frames: run unipost, ndate and copygb
on a single wrfout file containing multiple forecast times.
run_unipost _gracet: run unipost, ndate and copygb
on wrfout
files with non-zero minutes/seconds.
run_unipost _minute: run unipost, ndate and copygb
for sub-hourly wrfout files.
include*: Source include modules built/used
during compilation of UPP
lib*: Archived libraries built/used by UPP
parm: Contains the parameter
files, which can be modified by the user to control how the post processing is
performed.
src: Contains source codes for:
copygb: Source code for copygb
ndate: Source code for ndate
unipost: Source
code for unipost
lib: Contains source code
subdirectories for the UPP libraries
bacio: Binary I/O library
crtm2: Community Radiative
Transfer Model library
ip: General interpolation
library (see lib/iplib/iplib.doc)
mersenne: Random number
generator
sfcio: API for performing I/O
on the surface restart file of the global spectral model
sigio: API for performing I/O
on the sigma restart file of the global spectral model
sp: Spectral transform
library (see lib/splib/splib.doc)
w3: Library for coding and
decoding data in GRIB1 format
Note: The version of this library included in
this package is Endian- independent and can be used on LINUX and IBM systems.
wrfmpi_stubs: Contains some C and FORTRAN
codes to genereate libmpi.a library used to replace MPI calls for serial
compilation.
Installing
the UPP Code
UPP
uses a build mechanism similar to that used by the WRF model. There are two environment variables that must
be set before beginning the installation: a variable to define the path to a
similarly compiled version of WRF and a variable to a compatible version of
netCDF. If the environment variable WRF_DIR
is set by (for example),
setenv WRF_DIR /home/user/WRFV3
this
path will be used to reference WRF libraries and modules. Otherwise, the path
../WRFV3
will
be used.
In
the case neither method is set, the configure script will automatically prompt
you for a pathname.
To
reference the netCDF libraries, the configure script checks for an environment
variable (NETCDF) first, then the system default (/user/local/netcdf), and
then a user supplied link (./netcdf_links). If none of these resolve a path, the user
will be prompted by the configure script to supply a path.
If WRF was
compiled with the environment variable:
setenv HWRF 1
This must
also be set when compiling UPP.
.
Type configure,
and provide the required info. For example:
./configure
You will be given a list of choices for your computer.
Choices for IBM machines are as follows:
1. AIX xlf compiler with xlc (serial)
2. AIX xlf compiler with xlc (dmpar)
Choices for LINUX operating systems are as follows:
1. LINUX i486 i586 i686, PGI compiler (serial)
2. LINUX i486 i586 i686, PGI compiler (dmpar)
3. LINUX i486 i586 i686, Intel compiler (serial)
4. LINUX i486 i586 i686, Intel compiler (dmpar)
5. LINUX i486 i586 i686, gfortran compiler (serial)
6. LINUX i486 i586 i686, gfortran compiler (dmpar)
Note: UPP can be compiled
with distributed memory (and linked to a dmpar compilation of WRF), however, it
can only be run on one processor at this time (must set np=1).
Choose
one of the configure options listed.
Check the configure.upp file created and edit for compile options/paths,
if necessary. For debug flag settings,
the configure script can be run with a –d switch or flag.
To
compile UPP, enter the following command:
./compile >& compile_upp.log &
This command
should create eight UPP libraries in UPPV1/lib/ (libbacio.a, llibCRTM.a,
libip.a,
libmersenne.a,
ibsfcio.a,
libsigio.a,
libsp.a,
and
libw3.a) and three WRF Postprocessor executables in exec/ (wrfpost.exe,
ndate.exe,
and copygb.exe).
To remove all
built files, as well as the configure.upp, type:
./clean
This action
is recommended if a mistake is made during the installation process or a change
is made to the configuration or build environment. There is also a clean –a option which
will revert back to a pre-install configuration.
UPP
Functionalities
The Unified Post Processor,
_
is compatible with WRF v3.3 and higher.
_
can be used to post-process WRF-ARW,
WRF-NMM, GFS, and CFS forecasts (community support provided for WRF-based
forecasts).
_
can ingest WRF history files (wrfout*)
in two formats: netCDF and binary.
_
The Unified Post Processor is divided into two parts:
1.
Unipost
·
Interpolates forecasts from the model’s
native vertical coordinate to NWS standard output levels (e.g., pressure,
height) and computes mean sea level pressure. If the requested parameter is on
a model’s native level, then no vertical interpolation is performed.
·
Computes diagnostic output quantities
(e.g., convective available potential energy, helicity, radar reflectivity). A
full list of fields that can be generated by unipost is shown in Table 3.
·
Except for new capabilities of post processing
GFS/CFS and additions of many new variables, UPP uses the same algorithms to
derive most existing variables as were used in WPP. The only three
exceptions/changes from the WPP are:
Ø
Computes RH w.r.t. ice for GFS, but w.r.t.
water for all other supported models. WPP computed RH w.r.t. water only.
Ø The height and wind speed at the maximum wind level is computed by assuming the wind speed varies quadratically in height in the location of the maximum wind level. The WPP defined maximum wind level at the level with the maximum wind speed among all model levels.
Ø
The The static tropopause level is
obtained by finding the lowest level that has a temperature lapse rate of less
than 2 K/km over a 2 km depth above it. The WPP defined the tropopause by
finding the lowest level that has a mean temperature lapse rate of 2 K/km over
three model layers.
·
Outputs the results in NWS and WMO
standard GRIB1 format (for GRIB documentation, see http://www.nco.ncep.noaa.gov/pmb/docs/).
·
Destaggers the WRF-ARW forecasts from a
C-grid to an A-grid.
·
Outputs two navigation files, copygb_nav.txt
(for WRF-NMM output only) and copygb_hwrf.txt (for
WRF-ARW and WRF-NMM). These files can be
used as input for copygb.
Ø
copygb_nav.txt: This
file contains the GRID GDS of a Lambert Conformal Grid similar in domain and
grid spacing to the one used to run the WRF-NMM. The Lambert Conformal map
projection works well for mid-latitudes.
Ø
copygb_hwrf.txt:
This file contains the GRID GDS of a Latitude-Longitude Grid similar in domain
and grid spacing to the one used to run the WRF model. The latitude-longitude
grid works well for tropics.
2.
Copygb
·
Destaggers the WRF-NMM forecasts from the
staggered native E-grid to a regular non-staggered grid. (Since unipost
destaggers WRF-ARW output from a C-grid to an A-grid, WRF-ARW data can be
displayed directly without going through copygb.)
·
Interpolates the forecasts horizontally
from their native grid to a standard AWIPS or user-defined grid (for
information on AWIPS grids, see http://www.nco.ncep.noaa.gov/pmb/docs/on388/tableb.html).
·
Outputs the results in NWS and WMO
standard GRIB1 format (for GRIB documentation, see http://www.nco.ncep.noaa.gov/pmb/docs/).
In addition to unipost and copygb, a utility called ndate
is distributed with the Unified Post Processor tarfile. This utility is used to format the dates of
the forecasts to be posted for ingestion by the codes.
Setting
up the WRF model to interface with UPP
The unipost program is currently set up to read a large number of
fields from the WRF model history files.
This configuration stems from NCEP's need to generate all of its
required operational products. A list of
the fields that are currently read in by unipost is provided for the WRF-NMM
in Table 1 andWRF-ARW in Table 2. Tables for the GFS and CFS fields will be
added in the future. When using the
netCDF or mpi binary read, this program is configured such that it will run
successfully even if an expected input field is missing from the WRF history
file as long as this field is not required to produce a requested output
field. If the pre-requisites for a
requested output field are missing from the WRF history file, unipost
will abort at run time.
Take care not to remove fields from the wrfout files, which may
be needed for diagnostic purposes by the UPP package. For example, if isobaric state fields are
requested, but the pressure fields on model interfaces (PINT for WRF-NMM, P and
PB for WRF-ARW) are not available in the history file, unipost will abort at run
time. In general, the default fields
available in the wrfout files are sufficient to run UPP. The fields written to the WRF history file
are controlled by the settings in the Registry file (see Registry.EM or
Registry.NMM(_NEST) files in the Registry subdirectory of the main WRFV3
directory).
UPP is written to process a single forecast hour, therefore, having
a single forecast per output file is optimal.
However, UPP can be run across multiple forecast times in a single
output file to extract a specified forecast hour.
Note: It is necessary to re-compile the WRF model
source code after modifying the Registry file.
Table
1. List of all possible fields read in by unipost for the WRF-NMM:
|
T |
SFCEXC |
NRDSW |
|
U |
VEGFRC |
ARDSW |
|
V |
ACSNOW |
ALWIN |
|
Q |
ACSNOM |
ALWOUT |
|
CWM |
CMC |
NRDLW |
|
F_ICE |
SST |
ARDLW |
|
F_RAIN |
EXCH_H |
ALWTOA |
|
F_RIMEF |
EL_MYJ |
ASWTOA |
|
W |
THZ0 |
TGROUND |
|
PINT |
QZ0 |
SOILTB |
|
PT |
UZ0 |
TWBS |
|
PDTOP |
VZ0 |
SFCSHX |
|
FIS |
QS |
NSRFC |
|
SMC |
Z0 |
ASRFC |
|
SH2O |
PBLH |
QWBS |
|
STC |
USTAR |
SFCLHX |
|
CFRACH |
AKHS_OUT |
GRNFLX |
|
CFRACL |
AKMS_OUT |
SUBSHX |
|
CFRACM |
THS |
POTEVP |
|
SLDPTH |
PREC |
WEASD |
|
U10 |
CUPREC |
SNO |
|
V10 |
ACPREC |
SI |
|
TH10 |
CUPPT |
PCTSNO |
|
Q10 |
LSPA |
IVGTYP |
|
TSHLTR |
CLDEFI |
ISLTYP |
|
QSHLTR |
HTOP |
ISLOPE |
|
PSHLTR |
HBOT |
SM |
|
SMSTAV |
HTOPD |
SICE |
|
SMSTOT |
HBOTD |
ALBEDO |
|
ACFRCV |
HTOPS |
ALBASE |
|
ACFRST |
HBOTS |
GLAT |
|
RLWTT |
SR |
XLONG |
|
RSWTT |
RSWIN |
GLON |
|
AVRAIN |
CZEN |
DX_NMM |
|
AVCNVC |
CZMEAN |
NPHS0 |
|
TCUCN |
RSWOUT |
NCLOD |
|
TRAIN |
RLWIN |
NPREC |
|
NCFRCV |
SIGT4 |
NHEAT |
|
NCFRST |
RADOT |
SFCEVP |
|
SFROFF |
ASWIN |
|
|
UDROFF |
ASWOUT |
|
Note: For WRF-NMM, the period of accumulated precipitation is controlled by the namelist.input variable tprec. Hence, this field in the wrfout file represents an accumulation over the time period tprec*INT[(fhr-Σ)/tprec] to fhr, where fhr represents the forecast hour and Σ is a small number. The GRIB file output by unipost and by copygb contains fields with the name of accumulation period.
Table
2. List of all possible fields read in by unipost for the WRF-ARW:
|
T |
MUB |
SFROFF |
|
U |
P_TOP |
UDROFF |
|
V |
PHB |
SFCEVP |
|
QVAPOR |
PH |
SFCEXC |
|
QCLOUD |
SMOIS |
VEGFRA |
|
QICE |
TSLB |
ACSNOW |
|
QRAIN |
CLDFRA |
ACSNOM |
|
QSNOW |
U10 |
CANWAT |
|
QGRAUP |
V10 |
SST |
|
W |
TH2 |
THZ0 |
|
PB |
Q2 |
QZ0 |
|
P |
SMSTAV |
UZ0 |
|
MU |
SMSTOT |
VZ0 |
|
QSFC |
HGT |
ISLTYP |
|
Z0 |
ALBEDO |
ISLOPE |
|
UST |
GSW |
XLAND |
|
AKHS |
GLW |
XLAT |
|
AKMS |
TMN |
XLONG |
|
TSK |
HFX |
MAPFAC_M |
|
RAINC |
LH |
STEPBL |
|
RAINNC |
GRDFLX |
HTOP |
|
RAINCV |
SNOW |
HBOT |
|
RAINNCV |
SNOWC |
|
Note: For WRF-ARW, the accumulated precipitation fields (RAINC and RAINNC) are run total accumulations.
UPP Control File
Overview
The user interacts with unipost through the control file, parm/wrf_cntrl.parm. The control file is composed of a header and
a body. The header specifies the output file information. The body allows the user to select which
fields and levels to process.
The
header of the wrf_cntrl.parm file contains the following variables:
·
KGTYPE: defines output grid type, which should always be 255.
·
IMDLTY: identifies the process ID for AWIPS.
·
DATSET: defines the
prefix used for the output file name. Currently set to “WRFPRS”. Note: the run_* scripts assume “WRFPRS”
is used.
The body of the wrf_cntrl.parm file is composed of a
series of line pairs similar to the following:
(PRESS ON MDL SFCS ) SCAL=( 3.0)
L=(11000 00000 00000 00000 00000 00000 00000
00000 00000 00000 00000 00000 00000 00000)
where,
·
The
top line specifies the variable (e.g. PRESS) to process, the level type (e.g.
ON MDL SFCS) a user is interested in, and the degree of accuracy to be retained
(SCAL=3.0) in the GRIB output.
·
SCAL
defines the precision of the data written out to the GRIB format. Positive
values denote decimal scaling (maintain that number of significant digits),
while negative values describe binary scaling (precise to 2^{SCAL}; i.e.,
SCAL=-3.0 gives output precise to the nearest 1/8). Because copygb is unable to handle binary
precision at this time, negative numbers are discouraged.
·
A
list of all possible output fields for unipost is provided in Table 3. This table provides the full name of the
variable in the first column and an abbreviated name in the second column. The abbreviated names are used in the control
file. Note that the variable names also
contain the type of level on which they are output. For instance, temperature is available on
“model surface” and “pressure surface”.
·
The
second line specifies the levels on which the variable is to be posted. “0”indicates no output at this level and “1”
indicates output the variable specified on the top line at the level specified
by the position of the digit and the type of level defined for this
variable. For flight/wind energy fields,
a “2” may be specified, such that “2” requests AGL and “1” requests MSL.
Controlling
which variables unipost outputs
To output a field, the body of the control file needs to
contain an entry for the appropriate variable and output for this variable must
be turned on for at least one level (see "Controlling which levels unipost outputs"). If an entry for a particular field is not yet
available in the control file, two lines may be added to the control file with
the appropriate entries for that field.
Controlling
which levels unipost outputs
The second line of each pair determines which levels unipost
will output. Output on a given level is turned off by a “0” or turned on by a
“1”.
·
For
isobaric output, 47 levels are possible, from 2 to 1013 hPa (8 levels above 75 mb and then every 25 mb
from 75 to 1000 mb). The complete
list of levels is specified in sorc/unipost/CTLBLK.f.
_
Modify
specification of variable LSMDEF to change the number of pressure levels: LSMDEF=47
_
Modify
specification of SPLDEF array to change the values of pressure levels:
(/200.,500.,700.,1000.,2000.,3000.
&,5000.,7000.,7500.,10000.,12500.,15000.,17500.,20000., …/)
·
For
model-level output, all model levels are possible, from the highest to the
lowest.
·
When
using the Noah LSM, the soil layers
are 0-10 cm, 10-40 cm, 40-100 cm, and 100-200
cm.
·
When
using the RUC LSM, the soil levels
are 0 cm, 5 cm, 20 cm, 40 cm, 160 cm, and 300 cm. For the RUC LSM it is also necessary to turn
on two additional output levels in the wrf_cntrl.parm to output 6 levels
rather than the default 4 layers for the Noah LSM.
·
For PBL layer
averages, the levels correspond to 6 layers with a thickness of 30 hPa each.
· For flight level, the levels are 30 m, 50 m, 80 m, 100 m, 305 m, 457 m, 610 m, 914 m,1524 m,1829 m, 2134 m, 2743 m, 3658 m, 4572 m, and 6000 m.
· For AGL RADAR Reflectivity, the levels are 4000 and 1000 m.
·
For
surface or shelter-level output, only the first position of the line needs to
be turned on.
o
For
example, the sample control file parm/wrf_cntrl.parm has the
following entry for surface dew point temperature:
(SURFACE DEWPOINT ) SCAL=( 4.0)
L=(00000 00000 00000 00000 00000 00000
00000 00000 00000 00000 00000 00000 00000 00000)
Based on this entry, surface dew point
temperature will not be output by unipost. To add this field to the output, modify the
entry to read:
(SURFACE DEWPOINT ) SCAL=( 4.0)
L=(10000 00000 00000 00000 00000 00000
00000 00000 00000 00000 00000 00000 00000 00000)
Running
UPP
Six scripts for running the Unified Post Processor package are
included in the tar file:
run_unipost
run_unipostandgrads
run_unipostandgempak
run_unipost_frames
run_unipost_gracet
run_unipost_minute
Before running any of the above listed scripts, perform the
following instructions:
1. cd to your DOMAINPATH directory.
2. Make a directory to put the UPP results.
mkdir postprd
3. Make a directory to put a copy of wrf_cntrl.parm file.
mkdir
parm
4. Copy over the default UPPV1/parm/wrf_cntrl.parm to your working directory to customize unipost.
5. Edit the wrf_cntrl.parm file to reflect the fields and levels you want unipost to output.
6. Copy over the (UPPV1/scripts/run_unipost*)
script of your choice to the postprd/.
7. Edit the run script as
outlined below.
Once these directories are set up and the edits outlined above are
completed, the scripts can be run interactively from the postprd directory by
simply typing the script name on the command line.
Overview of the scripts to run the UPP
Note: It is recommended that the user refer to the run_unipost*
scripts in the script/ while reading this overview.
1.
Set
up environmental variables:
TOP_DIR: top level directory for source
codes (UPPV1 and WRFV3)
DOMAINPATH: directory where UPP will be run
from
WRFPATH: path to your WRFV3 build;
defaults to the environment variable used during the installation with the
configure script
UNI_POST_HOME: path to your UPPV1 build
POSTEXEC: path to your UPPV1 executables
Note: The
scripts are configured such that unipost expects the WRF history
files (wrfout* files) to be in wrfprd/, the wrf_cntrl.parm file to be
in parm/
and the postprocessor working directory to called postprd/, all under DOMAINPATH.
2.
Specify
dynamic core being run (“NMM” or “ARW”)
3.
Specify
the forecast cycles to be post-processed
startdate: YYYYMMDDHH of forecast cycle
fhr: first forecast hour
lastfhr: last forecast hour
incrementhr: increment (in hours) between
forecast files (Do not set to 0 or the script will loop continuously)
4.
Set
naming convention for prefix and extension of output file name
i.
comsp is the initial string of the
output file name (by default it is not set (and the prefix of the output file
will be the string set in wrf_cntrl.parm DATSET), if set it
will concatenate the setting to the front of the string specified in wrf_cntrl.parm
DATSET)
ii.
tmmark is used for the file extension (in
run_unipost,
tmmark=tm00, if not set it is set to .GrbF)
5.
Set
up how many domains will be post-processed
For
runs with a single domain, use “for domain d01”.
For
runs with multiple domains, use “for domain d01 d02 .. dnn”
6.
Create
namelist itag that will be read in by unipost.exe from stdin
(unit 5). This namelist contains 4 lines:
i.
Name of the WRF output file to be posted.
ii.
Format of WRF model output (netcdf or binary
or binarympiio).
iii.
Forecast valid time (not model start time)
in WRF format (the forecast time desired to be post-processed).
iv.
Dynamic core used (NMM or NCAR).
7.
Run unipost and check for errors.
·
The execution command in the distributed
scripts is for a single processor: ./unipost.exe
> outpost.
·
To run unipost using mpi (dmpar
compilation), the command line should be (note: at this time, the number of processors must be set to 1; N=1):
o
LINUX-MPI systems: mpirun -np N unipost.exe <
itag > outpost (Note: on some
systems a host file also needs to be specified: –machinefile “host”)
o
IBM: mpirun.lsf unipost.exe < itag >
outpost
8.
Set
up grid to post to (see full description under “Run copygb” below)
copygb is
run with a pre-defined AWIPS grid
gridno:
standard AWIPS grid to interpolate WRF model output to
copygb ingests a kgds definition on the
command line
copygb ingests the contents of file copygb_gridnav.txt
or copygb_hwrf.txt through variable nav
9.
Run copygb and check for errors.
copygb.exe –xg“grid [kgds]” input_file
output_file
where grid refers to the output grid to
which the native forecast is being interpolated.
The
output grid can be specified in three ways:
i.
As the grid id of a pre-defined AWIPS
grid:
copygb.exe
-g${gridno} -x input_file output_file
For example, using grid
218:
copygb.exe
-xg“218” WRFPRS_$domain.${fhr} wrfprs_$domain .${fhr}
ii. As a user defined standard grid, such as for
grid 255:
copygb.exe –xg“255 kgds” input_file output_file
where the user
defined grid is specified by a full set of kgds parameters determining a GRIB
GDS (grid description section) in the W3fi63 format. Details on how to
specify the kgds parameters are documented in file lib/w3lib/w3fi71.f. For
example:
copygb.exe
-xg“ 255 3 109 91 37719 -77645 8 -71000 10433 9966 0 64 42000 42000”
WRFPRS_$domain.${fhr} wrfprs_$domain.${fhr}
iii. Specifying output grid as a file: When WRF-NMM
output in is processed by unipost, two text files copygb_gridnav.txt
and copygb_hwrf.txt are created. These files contain the GRID GDS
of a Lambert Conformal Grid (file copygb_gridnav.txt) or lat/lon grid
(copygb_hwrf.txt)
similar in domain and grid spacing to the one used to run the WRF-NMM model.
The contents of one of these files are read into variable nav and can be used as
input to copygb.exe.
copygb.exe
-xg“$nav” input_file output_file
For example, when using “copygb_gridnav.txt”
for an application the steps include:
read
nav < 'copygb_gridnav.txt'
export nav
copygb.exe
-xg"${nav}" WRFPRS_$domain.${fhr} wrfprs_$domain.${fhr}
If scripts run_unipostandgrads or run_unipostandgempak
are used, additional steps are taken to create image files (see Visualization section below).
Upon a successful run, unipost and copygb will generate
output files WRFPRS_dnn.hhh and wrfprs_dnn.hhh,
respectively, in the post-processor working directory, where “nn” refers
to the domain id and “hhh” denotes
the forecast hour. In addition, the
script run_unipostandgrads will produce a suite of gif images named variablehh_GrADS.gif,
and the script run_unipostandgempak will produce a suite of gif images named variablehh.gif. An additional file containing native grid
navigation information (griddef.out), which is currently not
used, will also be produced.
If the run did not complete successfully, a log file in the
post-processor working directory called unipost_dnn.hhh.out, where “nn” is the domain id and “hhh” is the forecast hour, may be
consulted for further information.
It should be noted that copygb is a flexible program that
can accept several command line options specifying details of how the
horizontal interpolation from the native grid to the output grid should be
performed. Complete documentation of copygb can be found in UPPV1/src/copygb/copygb.doc.
Visualization
with UPP
GEMPAK
The GEMPAK utility nagrib is able to decode GRIB files
whose navigation is on any non-staggered grid.
Hence, GEMPAK is able to decode GRIB files generated by the Unified Post
Processing package and plot horizontal fields or vertical cross sections.
A sample script named run_unipostandgempak, which is
included in the scripts directory of the tar file, can be used to run unipost,
copygb,
and plot the following fields using GEMPAK:
·
Sfcmap_dnn_hh.gif: mean
SLP and 6 hourly precipitation
·
PrecipType_dnn_hh.gif:
precipitation type (just snow and rain)
·
850mbRH_dnn_hh.gif: 850
mb relative humidity
·
850mbTempandWind_dnn_hh.gif: 850
mb temperature and wind vectors
·
500mbHandVort_dnn_hh.gif: 500
mb geopotential height and vorticity
·
250mbWindandH_dnn_hh.gif: 250
mb wind speed isotacs and geopotential height
This script can be modified to customize fields for output. GEMPAK
has an online users guide at: http://www.unidata.ucar.edu/software/gempak/help_and_documentation/manual/.
In order to use the script run_unipostandgempak, it is
necessary to set the environment variable GEMEXEC to the path of the GEMPAK
executables. For example,
setenv GEMEXEC /usr/local/gempak/bin
Note: For GEMPAK, the precipitation accumulation period for WRF-NMM is given by the variable incrementhr in the run_unipostandgempak script.
GrADS
The GrADS utilities grib2ctl.pl and gribmap are able to
decode GRIB files whose navigation is on any non-staggered grid. These utilities and instructions on how to
use them to generate GrADS control files are available from: http://www.cpc.ncep.noaa.gov/products/wesley/grib2ctl.html.
The GrADS package is available from: http://grads.iges.org/grads/grads.html.
GrADS has an online User’s Guide at: http://grads.iges.org/grads/gadoc/ and
a list of basic commands for GrADS can be found at: http://www.iges.org/grads/gadoc/commandsatt.html.
A sample script named run_unipostandgrads, which is
included in the scripts directory of the Unified Post Processing package, can
be used to run unipost, copygb, and plot the following
fields using GrADS:
·
Sfcmaphh_dnn_GRADS.gif:
mean SLP and 6-hour accumulated precipitation.
·
850mbRHhh_dnn_GRADS.gif: 850
mb relative humidity
·
850mbTempandWindhh_dnn_GRADS.gif: 850
mb temperature and wind vectors
·
500mbHandVorthh_dnn_GRADS.gif: 500
mb geopotential heights and absolute vorticity
·
250mbWindandHhh_dnn_GRADS.gif: 250
mb wind speed isotacs and geopotential heights
In order to use the script run_unipostandgrads, it is necessary
to:
1.
Set the environmental variable GADDIR
to the path of the GrADS fonts and auxiliary files. For example,
setenv GADDIR /usr/local/grads/data
2.
Add the location of the GrADS executables
to the PATH. For example
setenv PATH /usr/local/grads/bin:$PATH
3.
Link script cbar.gs to the
post-processor working directory. (This scripts is provided in UPP package, and
the run_unipostandgrads
script makes a link from scripts/ to postprd/.) To generate
the plots above, GrADS script cbar.gs is invoked. This script can
also be obtained from the GrADS library of scripts at http://grads.iges.org/grads/gadoc/library.html.
Note: For GrADS, the precipitation accumulation period for WRF-NMM is plotted over the subintervals of the tprec hour (set in namelist.input).
Fields
produced by unipost
Table 3 lists basic and derived fields that are currently produced
by unipost.
The abbreviated names listed in the second column describe how the fields
should be entered in the control file (wrf_cntrl.parm).
Table
3: Fields produced by unipost (column 1), abbreviated names
used in the wrf_cntrl.parm file
(column 2), corresponding GRIB identification number for the field (column 3),
and corresponding GRIB identification number for the vertical coordinate
(column 4).
|
Field Name |
Name In Control File |
Grib ID |
Vertical Level |
|
Radar reflectivity on model
surface |
RADAR REFL MDL SFCS |
211 |
109 |
|
Pressure on model surface |
PRESS ON MDL SFCS |
1 |
109 |
|
Height on model surface |
HEIGHT ON MDL SFCS |
7 |
109 |
|
Temperature on model
surface |
TEMP ON MDL SFCS |
11 |
109 |
|
Potential temperature on
model surface |
POT TEMP ON MDL SFCS |
13 |
109 |
|
Dew point temperature on
model surface |
DWPT TEMP ON MDL SFC |
17 |
109 |
|
Specific humidity on model surface |
SPEC HUM ON MDL SFCS |
51 |
109 |
|
Relative humidity on model
surface |
REL HUM ON MDL SFCS |
52 |
109 |
|
Moisture convergence on model surface |
MST CNVG ON MDL SFCS |
135 |
109 |
|
U component wind on model
surface |
U WIND ON MDL SFCS |
33 |
109 |
|
V component wind on model surface |
V WIND ON MDL SFCS |
34 |
109 |
|
Cloud water on model
surface |
CLD WTR ON MDL SFCS |
153 |
109 |
|
Cloud ice on model surface |
CLD ICE ON MDL SFCS |
58 |
109 |
|
Rain on model surface |
RAIN ON MDL SFCS |
170 |
109 |
|
Snow on model surface |
SNOW ON MDL SFCS |
171 |
109 |
|
Cloud fraction on model
surface |
CLD FRAC ON MDL SFCS |
71 |
109 |
|
Omega on model surface |
OMEGA ON MDL SFCS |
39 |
109 |
|
Absolute vorticity on model
surface |
ABS VORT ON MDL SFCS |
41 |
109 |
|
Geostrophic streamfunction
on model surface |
STRMFUNC ON MDL SFCS |
35 |
109 |
|
Turbulent kinetic energy on
model surface |
TRBLNT KE ON MDL SFC |
158 |
109 |
|
Richardson number on model
surface |
RCHDSN NO ON MDL SFC |
254 |
109 |
|
Master length scale on
model surface |
MASTER LENGTH SCALE |
226 |
109 |
|
Asymptotic length scale on
model surface |
ASYMPT MSTR LEN SCL |
227 |
109 |
|
Radar reflectivity on
pressure surface |
RADAR REFL ON P SFCS |
211 |
100 |
|
Height on pressure surface |
HEIGHT OF PRESS SFCS |
7 |
100 |
|
Temperature on pressure
surface |
TEMP ON PRESS SFCS |
11 |
100 |
|
Potential temperature on
pressure surface |
POT TEMP ON P SFCS |
13 |
100 |
|
Dew point temperature on
pressure surface |
DWPT TEMP ON P SFCS |
17 |
100 |
|
Specific humidity on
pressure surface |
SPEC HUM ON P SFCS |
51 |
100 |
|
Relative humidity on
pressure surface |
REL HUMID ON P SFCS |
52 |
100 |
|
Moisture convergence on pressure surface |
MST CNVG ON P SFCS |
135 |
100 |
|
U component wind on
pressure surface |
U WIND ON PRESS SFCS |
33 |
100 |
|
V component wind on
pressure surface |
V WIND ON PRESS SFCS |
34 |
100 |
|
Omega on pressure surface |
OMEGA ON PRESS SFCS |
39 |
100 |
|
Absolute vorticity on
pressure surface |
ABS VORT ON P SFCS |
41 |
100 |
|
Geostrophic streamfunction
on pressure surface |
STRMFUNC ON P SFCS |
35 |
100 |
|
Turbulent kinetic energy on
pressure surface |
TRBLNT KE ON P SFCS |
158 |
100 |
|
Cloud water on pressure
surface |
CLOUD WATR ON P SFCS |
153 |
100 |
|
Cloud ice on pressure surface |
CLOUD ICE ON P SFCS |
58 |
100 |
|
Rain on pressure surface |
RAIN ON P SFCS |
170 |
100 |
|
Snow water on pressure
surface |
SNOW ON P SFCS |
171 |
100 |
|
Total condensate on pressure surface |
CONDENSATE ON P SFCS |
135 |
100 |
|
Mesinger (Membrane) sea
level pressure |
MESINGER MEAN SLP |
130 |
102 |
|
Shuell sea level pressure |
SHUELL MEAN SLP |
2 |
102 |
|
2 M pressure |
SHELTER PRESSURE |
1 |
105 |
|
2 M temperature |
SHELTER TEMPERATURE |
11 |
105 |
|
2 M specific humidity |
SHELTER SPEC HUMID |
51 |
105 |
|
2 M mixing ratio |
SHELTER MIX RATIO |
53 |
105 |
|
2 M dew point temperature |
SHELTER DEWPOINT |
17 |
105 |
|
2 M RH |
SHELTER REL HUMID |
52 |
105 |
|
10 M u component wind |
U WIND AT ANEMOM HT |
33 |
105 |
|
10 M v component wind |
V WIND AT ANEMOM HT |
34 |
105 |
|
10 M potential temperature |
POT TEMP AT 10 M |
13 |
105 |
|
10 M specific humidity |
SPEC HUM AT 10 M |
51 |
105 |
|
Surface pressure |
SURFACE PRESSURE |
1 |
1 |
|
Terrain height |
SURFACE HEIGHT |
7 |
1 |
|
Skin potential temperature |
SURFACE POT TEMP |
13 |
1 |
|
Skin specific humidity |
SURFACE SPEC HUMID |
51 |
1 |
|
Skin dew point temperature |
SURFACE DEWPOINT |
17 |
1 |
|
Skin Relative humidity |
SURFACE REL HUMID |
52 |
1 |
|
Skin temperature |
SFC (SKIN) TEMPRATUR |
11 |
1 |
|
Soil temperature at the
bottom of soil layers |
BOTTOM SOIL TEMP |
85 |
111 |
|
Soil temperature in between
each of soil layers |
SOIL TEMPERATURE |
85 |
112 |
|
Soil moisture in between
each of soil layers |
SOIL MOISTURE |
144 |
112 |
|
Snow water equivalent |
SNOW WATER EQUIVALNT |
65 |
1 |
|
Snow cover in percentage |
PERCENT SNOW COVER |
238 |
1 |
|
Heat exchange coeff at
surface |
SFC EXCHANGE COEF |
208 |
1 |
|
Vegetation cover |
GREEN VEG COVER |
87 |
1 |
|
Soil moisture availability |
SOIL MOISTURE AVAIL |
207 |
112 |
|
Ground heat flux -
instantaneous |
INST GROUND HEAT FLX |
155 |
1 |
|
Lifted index—surface based |
LIFTED INDEX—SURFCE |
131 |
101 |
|
Lifted index—best |
LIFTED INDEX—BEST |
132 |
116 |
|
Lifted index—from boundary
layer |
LIFTED INDEX—BNDLYR |
24 |
116 |
|
CAPE |
CNVCT AVBL POT ENRGY |
157 |
1 |
|
CIN |
CNVCT INHIBITION |
156 |
1 |
|
Column integrated
precipitable water |
PRECIPITABLE WATER |
54 |
200 |
|
Column integrated cloud
water |
TOTAL COLUMN CLD WTR |
136 |
200 |
|
Column integrated cloud ice |
TOTAL COLUMN CLD ICE |
137 |
200 |
|
Column integrated rain |
TOTAL COLUMN RAIN |
138 |
200 |
|
Column integrated snow |
TOTAL COLUMN SNOW |
139 |
200 |
|
Column integrated total
condensate |
TOTAL COL CONDENSATE |
140 |
200 |
|
Helicity |
STORM REL HELICITY |
190 |
106 |
|
U component storm motion |
U COMP STORM MOTION |
196 |
106 |
|
V component storm motion |
V COMP STORM MOTION |
197 |
106 |
|
Accumulated total
precipitation |
ACM TOTAL PRECIP |
61 |
1 |
|
Accumulated convective
precipitation |
ACM CONVCTIVE PRECIP |
63 |
1 |
|
Accumulated grid-scale
precipitation |
ACM GRD SCALE PRECIP |
62 |
1 |
|
Accumulated snowfall |
ACM SNOWFALL |
65 |
1 |
|
Accumulated total snow melt |
ACM SNOW TOTAL MELT |
99 |
1 |
|
Precipitation type (4
types) – instantaneous |
INSTANT PRECIP TYPE |
140 |
1 |
|
Precipitation rate -
instantaneous |
INSTANT PRECIP RATE |
59 |
1 |
|
Composite radar
reflectivity |
COMPOSITE RADAR REFL |
212 |
200 |
|
Low level cloud fraction |
LOW CLOUD FRACTION |
73 |
214 |
|
Mid level cloud fraction |
MID CLOUD FRACTION |
74 |
224 |
|
High level cloud fraction |
HIGH CLOUD FRACTION |
75 |
234 |
|
Total cloud fraction |
TOTAL CLD FRACTION |
71 |
200 |
|
Time-averaged total cloud
fraction |
AVG TOTAL CLD FRAC |
71 |
200 |
|
Time-averaged stratospheric
cloud fraction |
AVG STRAT CLD FRAC |
213 |
200 |
|
Time-averaged convective
cloud fraction |
AVG CNVCT CLD FRAC |
72 |
200 |
|
Cloud bottom pressure |
CLOUD BOT PRESSURE |
1 |
2 |
|
Cloud top pressure |
CLOUD TOP PRESSURE |
1 |
3 |
|
Cloud bottom height (above
MSL) |
CLOUD BOTTOM HEIGHT |
7 |
2 |
|
Cloud top height (above
MSL) |
CLOUD TOP HEIGHT |
7 |
3 |
|
Convective cloud bottom
pressure |
CONV CLOUD BOT PRESS |
1 |
242 |
|
Convective cloud top
pressure |
CONV CLOUD TOP PRESS |
1 |
243 |
|
Shallow convective cloud
bottom pressure |
SHAL CU CLD BOT PRES |
1 |
248 |
|
Shallow convective cloud
top pressure |
SHAL CU CLD TOP PRES |
1 |
249 |
|
Deep convective cloud
bottom pressure |
DEEP CU CLD BOT PRES |
1 |
251 |
|
Deep convective cloud top
pressure |
DEEP CU CLD TOP PRES |
1 |
252 |
|
Grid scale cloud bottom
pressure |
GRID CLOUD BOT PRESS |
1 |
206 |
|
Grid scale cloud top
pressure |
GRID CLOUD TOP PRESS |
1 |
207 |
|
Convective cloud fraction |
CONV CLOUD FRACTION |
72 |
200 |
|
Convective cloud efficiency |
CU CLOUD EFFICIENCY |
134 |
200 |
|
Above-ground height of LCL |
LCL AGL HEIGHT |
7 |
5 |
|
Pressure of LCL |
LCL PRESSURE |
1 |
5 |
|
Cloud top temperature |
CLOUD TOP TEMPS |
11 |
3 |
|
Temperature tendency from
radiative fluxes |
RADFLX CNVG TMP TNDY |
216 |
109 |
|
Temperature tendency from
shortwave radiative flux |
SW RAD TEMP TNDY |
250 |
109 |
|
Temperature tendency from
longwave radiative flux |
LW RAD TEMP TNDY |
251 |
109 |
|
Outgoing surface shortwave
radiation - instantaneous |
INSTN OUT SFC SW RAD |
211 |
1 |
|
Outgoing surface longwave
radiation - instantaneous |
INSTN OUT SFC LW RAD |
212 |
1 |
|
Incoming surface shortwave
radiation - |
AVE INCMG SFC SW RAD |
204 |
1 |
|
Incoming surface longwave
radiation - |
AVE INCMG SFC LW RAD |
205 |
1 |
|
Outgoing surface shortwave
radiation - |
AVE OUTGO SFC SW RAD |
211 |
1 |
|
Outgoing surface longwave
radiation – time-averaged |
AVE OUTGO SFC LW RAD |
212 |
1 |
|
Outgoing model top
shortwave radiation – time-averaged |
AVE OUTGO TOA SW RAD |
211 |
8 |
|
Outgoing model top longwave
radiation – time-averaged |
AVE OUTGO TOA LW RAD |
212 |
8 |
|
Incoming surface shortwave
radiation - instantaneous |
INSTN INC SFC SW RAD |
204 |
1 |
|
Incoming surface longwave
radiation - instantaneous |
INSTN INC SFC LW RAD |
205 |
1 |
|
Roughness length |
ROUGHNESS LENGTH |
83 |
1 |
|
Friction velocity |
FRICTION VELOCITY |
253 |
1 |
|
Surface drag coefficient |
SFC DRAG COEFFICIENT |
252 |
1 |
|
Surface u wind stress |
SFC U WIND STRESS |
124 |
1 |
|
Surface v wind stress |
SFC V WIND STRESS |
125 |
1 |
|
Surface sensible heat flux
- time-averaged |
AVE SFC SENHEAT FX |
122 |
1 |
|
Ground heat flux -
time-averaged |
AVE GROUND HEAT FX |
155 |
1 |
|
Surface latent heat flux -
time-averaged |
AVE SFC LATHEAT FX |
121 |
1 |
|
Surface momentum flux -
time-averaged |
AVE SFC MOMENTUM FX |
172 |
1 |
|
Accumulated surface
evaporation |
ACC SFC EVAPORATION |
57 |
1 |
|
Surface sensible heat flux
– instantaneous |
INST SFC SENHEAT FX |
122 |
1 |
|
Surface latent heat flux
- instantaneous |
INST SFC LATHEAT FX |
121 |
1 |
|
Latitude |
LATITUDE |
176 |
1 |
|
Longitude |
LONGITUDE |
177 |
1 |
|
Land sea mask (land=1,
sea=0) |
LAND/SEA MASK |
81 |
1 |
|
Sea ice mask |
SEA ICE MASK |
91 |
1 |
|
Surface midday albedo |
SFC MIDDAY ALBEDO |
84 |
1 |
|
Sea surface temperature |
SEA SFC TEMPERATURE |
80 |
1 |
|
Press at tropopause |
PRESS AT TROPOPAUSE |
1 |
7 |
|
Temperature at tropopause |
TEMP AT TROPOPAUSE |
11 |
7 |
|
Potential temperature at
tropopause |
POTENTL TEMP AT TROP |
13 |
7 |
|
U wind at tropopause |
U WIND AT TROPOPAUSE |
33 |
7 |
|
V wind at tropopause |
V WIND AT TROPOPAUSE |
34 |
7 |
|
Wind shear at tropopause |
SHEAR AT TROPOPAUSE |
136 |
7 |
|
Height at tropopause |
HEIGHT AT TROPOPAUSE |
7 |
7 |
|
Temperature at flight
levels |
TEMP AT FD HEIGHTS |
11 |
103 |
|
U wind at flight levels |
U WIND AT FD HEIGHTS |
33 |
103 |
|
V wind at flight levels |
V WIND AT FD HEIGHTS |
34 |
103 |
|
Freezing level height
(above mean sea level) |
HEIGHT OF FRZ LVL |
7 |
4 |
|
Freezing level RH |
REL HUMID AT FRZ LVL |
52 |
4 |
|
Highest freezing level
height |
HIGHEST FREEZE LVL |
7 |
204 |
|
Pressure in boundary layer
(30 mb mean) |
PRESS IN BNDRY LYR |
1 |
116 |
|
Temperature in boundary
layer (30 mb mean) |
TEMP IN BNDRY LYR |
11 |
116 |
|
Potential temperature in
boundary layers (30 mb mean) |
POT TMP IN BNDRY LYR |
13 |
116 |
|
Dew point temperature in
boundary layer (30 mb mean) |
DWPT IN BNDRY LYR |
17 |
116 |
|
Specific humidity in
boundary layer (30 mb mean) |
SPC HUM IN BNDRY LYR |
51 |
116 |
|
RH in boundary layer (30 mb
mean) |
REL HUM IN BNDRY LYR |
52 |
116 |
|
Moisture convergence in
boundary layer (30 mb mean) |
MST CNV IN BNDRY LYR |
135 |
116 |
|
Precipitable water in
boundary layer (30 mb mean) |
P WATER IN BNDRY LYR |
54 |
116 |
|
U wind in boundary layer
(30 mb mean) |
U WIND IN BNDRY LYR |
33 |
116 |
|
V wind in boundary layer
(30 mb mean) |
V WIND IN BNDRY LYR |
34 |
116 |
|
Omega in boundary layer (30
mb mean) |
OMEGA IN BNDRY LYR |
39 |
116 |
|
Visibility |
VISIBILITY |
20 |
1 |
|
Vegetation type |
VEGETATION TYPE |
225 |
1 |
|
Soil type |
SOIL TYPE |
224 |
1 |
|
Canopy conductance |
CANOPY CONDUCTANCE |
181 |
1 |
|
PBL height |
PBL HEIGHT |
221 |
1 |
|
Slope type |
SLOPE TYPE |
222 |
1 |
|
Snow depth |
SNOW DEPTH |
66 |
1 |
|
Liquid soil moisture |
LIQUID SOIL MOISTURE |
160 |
112 |
|
Snow free albedo |
SNOW FREE ALBEDO |
170 |
1 |
|
Maximum snow albedo |
MAXIMUM SNOW ALBEDO |
159 |
1 |
|
Canopy water evaporation |
CANOPY WATER EVAP |
200 |
1 |
|
Direct soil evaporation |
DIRECT SOIL EVAP |
199 |
1 |
|
Plant transpiration |
PLANT TRANSPIRATION |
210 |
1 |
|
Snow sublimation |
SNOW SUBLIMATION |
198 |
1 |
|
Air dry soil moisture |
AIR DRY SOIL MOIST |
231 |
1 |
|
Soil moist porosity |
SOIL MOIST POROSITY |
240 |
1 |
|
Minimum stomatal resistance |
MIN STOMATAL RESIST |
203 |
1 |
|
Number of root layers |
NO OF ROOT LAYERS |
171 |
1 |
|
Soil moist wilting point |
SOIL MOIST WILT PT |
219 |
1 |
|
Soil moist reference |
SOIL MOIST REFERENCE |
230 |
1 |
|
Canopy conductance - solar
component |
CANOPY COND SOLAR |
246 |
1 |
|
Canopy conductance -
temperature component |
CANOPY COND TEMP |
247 |
1 |
|
Canopy conductance -
humidity component |
CANOPY COND HUMID |
248 |
1 |
|
Canopy conductance - soil
component |
CANOPY COND SOILM |
249 |
1 |
|
Potential evaporation |
POTENTIAL EVAP |
145 |
1 |
|
Heat diffusivity on sigma
surface |
DIFFUSION H RATE S S |
182 |
107 |
|
Surface wind gust |
SFC WIND GUST |
180 |
1 |
|
Convective precipitation
rate |
CONV PRECIP RATE |
214 |
1 |
|
Radar reflectivity at
certain above ground heights |
RADAR REFL AGL |
211 |
105 |
|
MAPS Sea Level Pressure |
MAPS SLP |
2 |
102 |
|
Total soil moisture |
TOTAL SOIL MOISTURE |
86 |
112 |
|
Plant canopy surface water |
PLANT CANOPY SFC WTR |
223 |
1 |
|
Accumulated storm surface
runoff |
ACM STORM SFC RNOFF |
235 |
1 |
|
Accumulated baseflow runoff |
ACM BSFL-GDWR RNOFF |
234 |
1 |
|
Fraction of frozen
precipitation |
FROZEN FRAC CLD SCHM |
194 |
1 |
|
GSD Cloud Base pressure |
GSD CLD BOT PRESSURE |
1 |
2 |
|
GSD Cloud Top pressure |
GSD CLD TOP PRESSURE |
1 |
3 |
|
Averaged temperature
tendency from grid scale latent heat release |
AVE GRDSCL RN TMPTDY |
241 |
109 |
|
Averaged temperature
tendency from convective latent heat release |
AVE CNVCT RN TMPTDY |
242 |
109 |
|
Average snow phase change
heat flux |
AVE SNO PHSCNG HT FX |
229 |
1 |
|
Accumulated potential
evaporation |
ACC POT EVAPORATION |
228 |
1 |
|
Highest freezing level
relative humidity |
HIGHEST FRZ LVL RH |
52 |
204 |
|
Maximum wind pressure level |
MAX WIND PRESS LEVEL |
1 |
6 |
|
Maximum wind height |
MAX WIND HGHT LEVEL |
7 |
6 |
|
U-component of maximum wind |
U COMP MAX WIND |
33 |
6 |
|
V-component of maximum wind |
V COMP MAX WIND |
34 |
6 |
|
GSD cloud base height |
GSD CLD BOT HEIGHT |
7 |
2 |
|
GSD cloud top height |
GSD CLD TOP HEIGHT |
7 |
3 |
|
GSD visibility |
GSD VISIBILITY |
20 |
1 |
|
Wind energy potential |
INSTN WIND POWER AGL |
126 |
105 |
|
U wind at 80 m above ground |
U WIND AT 80M AGL |
49 |
105 |
|
V wind at 80 m above ground |
V WIND AT 80M AGL |
50 |
105 |
|
Graupel on model surface |
GRAUPEL ON MDL SFCS |
179 |
109 |
|
Graupel on pressure surface |
GRAUPEL ON P SFCS |
179 |
100 |
|
Maximum updraft helicity |
MAX UPDRAFT HELICITY |
236 |
106 |
|
Maximum 1km reflectivity |
MAX 1km REFLECTIVITY |
235 |
105 |
|
Maximum wind speed at 10m |
MAX 10m WIND SPEED |
229 |
105 |
|
Maximum updraft vertical
velocity |
MAX UPDRAFT VERT VEL |
237 |
101 |
|
Maximum downdraft vertical
velocity |
MAX DNDRAFT VERT VEL |
238 |
101 |
|
Mean vertical velocity |
MEAN VERT VEL |
40 |
108 |
|
Radar echo top in KDT |
ECHO TOPS IN KFT |
7 |
105 |
|
Updraft helicity |
UPDRAFT HELICITY PRM |
227 |
106 |
|
Column integrated graupel |
VERT INTEG GRAUP |
179 |
200 |
|
Column integrated maximum
graupel |
MAX VERT INTEG GRAUP |
228 |
200 |
|
U-component of 0-1km level
wind shear |
U COMP 0-1 KM SHEAR |
230 |
106 |
|
V-component of 0-1km level
wind shear |
V COMP 0-1 KM SHEAR |
238 |
106 |
|
U-component of 0-6km level
wind shear |
U COMP 0-6 KM SHEAR |
239 |
106 |
|
V-component of 0-6km level
wind shear |
V COMP 0-6 KM SHEAR |
241 |
106 |
|
Total precipitation
accumulated over user-specified bucket |
BUCKET TOTAL PRECIP |
61 |
1 |
|
Convective precipitation
accumulated over user-specified bucket |
BUCKET CONV PRECIP |
63 |
1 |
|
Grid-scale precipitation
accumulated over user-specified bucket |
BUCKET GRDSCALE PRCP |
62 |
1 |
|
Snow accumulated over
user-specified bucket |
BUCKET SNOW PRECIP |
65 |
1 |
|
Model level fraction of
rain for Ferrier’s scheme |
F_rain ON MDL SFCS |
131 |
109 |
|
Model level fraction of ice
for Ferrier’s scheme |
F_ice ON MDL SFCS |
132 |
109 |
|
Model level riming factor
for Ferrier’s scheme |
F_RimeF ON MDL SFCS |
133 |
109 |
|
Model level total
condensate for Ferrier’s scheme |
CONDENSATE MDL SFCS |
135 |
109 |
|
Height of sigma surface |
HEIGHT OF SIGMA SFCS |
7 |
107 |
|
Temperature on sigma
surface |
TEMP ON SIGMA SFCS |
11 |
107 |
|
Specific humidity on sigma
surface |
SPEC HUM ON S SFCS |
51 |
107 |
|
U-wind on sigma surface |
U WIND ON SIGMA SFCS |
33 |
107 |
|
V-wind on sigma surface |
V WIND ON SIGMA SFCS |
34 |
107 |
|
Omega on sigma surface |
OMEGA ON SIGMA SFCS |
39 |
107 |
|
Cloud water on sigma
surface |
CLOUD WATR ON S SFCS |
153 |
107 |
|
Cloud ice on sigma surface |
CLOUD ICE ON S SFCS |
58 |
107 |
|
Rain on sigma surface |
RAIN ON S SFCS |
170 |
107 |
|
Snow on sigma surface |
SNOW ON S SFCS |
171 |
107 |
|
Condensate on sigma surface |
CONDENSATE ON S SFCS |
135 |
107 |
|
Pressure on sigma surface |
PRESS ON SIG SFCS |
1 |
107 |
|
Turbulent kinetic energy on
sigma surface |
TRBLNT KE ON S SFCS |
158 |
107 |
|
Cloud fraction on sigma
surface |
CLD FRAC ON SIG SFCS |
71 |
107 |
|
Graupel on sigma surface |
GRAUPEL ON S SFCS |
179 |
107 |
|
LCL level pressure |
LIFT PCL LVL PRESS |
141 |
116 |
|
LOWEST WET BULB ZERO HEIGHT |
LOW WET BULB ZERO HT |
7 |
245 |
|
Leaf area index |
LEAF AREA INDEX |
182 |
1 |
|
Accumulated land surface
model precipitation |
ACM LSM PRECIP |
154 |
1 |
|
In-flight icing |
IN-FLIGHT ICING |
186 |
100 |
|
Clear air turbulence |
CLEAR AIR TURBULENCE |
185 |
100 |
|
Wind shear between shelter
level and 2000 FT |
0-2000FT LLWS |
136 |
106 |
|
Ceiling |
CEILING |
7 |
215 |
|
Flight restritction |
FLIGHT RESTRICTION |
20 |
2 |
|
Instantaneous clear sky
incoming surface shortwave |
INSTN CLR INC SFC SW |
161 |
1 |
|
Pressure level riming
factor for Ferrier’s scheme |
F_RimeF ON P SFCS |
133 |
100 |
|
Model level vertical
volocity |
W WIND ON MDL SFCS |
40 |
109 |
|
Brightness temperature |
BRIGHTNESS TEMP |
213 |
8 |
|
Average albedo |
AVE ALBEDO |
84 |
1 |
|
Ozone on model surface |
OZONE ON MDL SFCS |
154 |
109 |
|
Ozone on pressure surface |
OZONE ON P SFCS |
154 |
100 |
|
Surface zonal momentum flux |
SFC ZONAL MOMEN FX |
124 |
1 |
|
Surface meridional momentum
flux |
SFC MERID MOMEN FX |
125 |
1 |
|
Average precipitation rate |
AVE PRECIP RATE |
59 |
1 |
|
Average convective
precipitation rate |
AVE CONV PRECIP RATE |
214 |
1 |
|
Instantaneous outgoing
longwave at top of atmosphere |
INSTN OUT TOA LW RAD |
212 |
8 |
|
Total spectrum brightness
temperature |
BRIGHTNESS TEMP NCAR |
118 |
8 |
|
Model top pressure |
MODEL TOP PRESSURE |
1 |
8 |
|
Composite rain radar
reflectivity |
COMPOSITE RAIN REFL |
165 |
200 |
|
Composite ice radar
reflectivity |
COMPOSITE ICE REFL |
166 |
200 |
|
Composite radar
reflectivity from convection |
COMPOSITE CONV REFL |
167 |
200 |
|
Rain radar reflecting angle |
RAIN RADAR REFL AGL |
165 |
105 |
|
Ice radar reflecting angle |
ICE RADAR REFL AGL |
166 |
105 |
|
Convection radar reflecting
angle |
CONV RADAR REFL AGL |
167 |
105 |
|
Model level vertical
velocity |
W WIND ON P SFCS |
40 |
100 |
|
Column integrated super
cool liquid water |
TOTAL COLD LIQUID |
168 |
200 |
|
Column integrated melting
ice |
TOTAL MELTING ICE |
169 |
200 |
|
Height of lowest level
super cool liquid water |
COLD LIQ BOT HEIGHT |
7 |
253 |
|
Height of highest level
super cool liquid water |
COLD LIQ TOP HEIGHT |
7 |
254 |
|
Richardson number planetary
boundary layer height |
RICH NO PBL HEIGHT |
7 |
220 |
|
Total column shortwave
temperature tendency |
TOT COL SW T TNDY |
250 |
200 |
|
Total column longwave
temperature tendency |
TOT COL LW T TNDY |
251 |
200 |
|
Total column gridded
temperature tendency |
TOT COL GRD T TNDY |
241 |
200 |
|
Total column convective
temperature tendency |
TOT COL CNVCT T TNDY |
242 |
200 |
|
Radiative flux temperature
tendency on pressure level |
RADFLX TMP TNDY ON P |
216 |
100 |
|
Column integrated moisture
convergence |
TOT COL MST CNVG |
135 |
200 |
|
Time averaged clear sky
incoming UV-B shortwave |
AVE CLR INC UV-B SW |
201 |
1 |
|
Time averaged incoming UV-B
shortwave |
AVE INC UV-B SW |
200 |
1 |
|
Total column ozone |
TOT COL OZONE |
10 |
200 |
|
Average low cloud fraction |
AVE LOW CLOUD FRAC |
71 |
214 |
|
Average mid cloud fraction |
AVE MID CLOUD FRAC |
71 |
224 |
|
Average high cloud fraction |
AVE HIGH CLOUD FRAC |
71 |
234 |
|
Average low cloud bottom
pressure |
AVE LOW CLOUD BOT P |
1 |
212 |
|
Average low cloud top
pressure |
AVE LOW CLOUD TOP P |
1 |
213 |
|
Average low cloud top
temperature |
AVE LOW CLOUD TOP T |
11 |
213 |
|
Average mid cloud bottom
pressure |
AVE MID CLOUD BOT P |
1 |
222 |
|
Average mid cloud top
pressure |
AVE MID CLOUD TOP P |
1 |
223 |
|
Average mid cloud top
temperature |
AVE MID CLOUD TOP T |
11 |
223 |
|
Average high cloud bottom
pressure |
AVE HIGH CLOUD BOT P |
1 |
232 |
|
Average high cloud top
pressure |
AVE HIGH CLOUD TOP P |
1 |
233 |
|
Average high cloud top
temperature |
AVE HIGH CLOUD TOP T |
11 |
233 |
|
Total column relative
humidity |
TOT COL REL HUM |
52 |
200 |
|
Cloud work function |
CLOUD WORK FUNCTION |
146 |
200 |
|
Temperature at maximum wind
level |
MAX WIND TEMPERATURE |
11 |
6 |
|
Time averaged zonal gravity
wave stress |
AVE Z GRAVITY STRESS |
147 |
1 |
|
Time averaged meridional
gravity wave stress |
AVE M GRAVITY STRESS |
148 |
1 |
|
Average precipitation type |
AVE PRECIP TYPE |
140 |
1 |
|
Simulated GOES 12 channel 2
brightness temperature |
GOES TB – CH 2 |
213 |
8 |
|
Simulated GOES 12 channel 3
brightness temperature |
GOES TB – CH 3 |
214 |
8 |
|
Simulated GOES 12 channel 4
brightness temperature |
GOES TB – CH4 |
215 |
8 |
|
Simulated GOES 12 channel 5
brightness temperature |
GOES TB – CH5 |
216 |
8 |
|
Cloud fraction on pressure
surface |
CLD FRAC ON P SFCS |
71 |
100 |
|
U-wind on theta surface |
U WIND ON THETA SFCS |
33 |
113 |
|
V-wind on theta surface |
V WIND ON THETA SFCS |
34 |
113 |
|
Temperature on theta
surface |
TEMP ON THETA SFCS |
11 |
113 |
|
Potential vorticity on
theta surface |
PV ON THETA SFCS |
4 |
113 |
|
Montgomery streamfunction
on theta surface |
M STRMFUNC ON THETA |
37 |
113 |
|
|
S STAB ON THETA SFCS |
19 |
113 |
|
Relative humidity on theta
surface |
RH ON THETA SFCS |
52 |
113 |
|
U wind on constant PV
surface |
U WIND ON PV SFCS |
33 |
117 |
|
V wind on constant PV surface |
V WIND ON PV SFCS |
34 |
117 |
|
Temperature on constant PV
surface |
TEMP ON PV SFCS |
11 |
117 |
|
Height on constant PV
surface |
HEIGHT ON PV SFCS |
7 |
117 |
|
Pressure on constant PV
surface |
PRESSURE ON PV SFCS |
1 |
117 |
|
Wind shear on constant PV
surface |
SHEAR ON PV SFCS |
136 |
117 |
|
Planetary boundary layer
cloud fraction |
PBL CLD FRACTION |
71 |
211 |
|
Average water runoff |
AVE WATER RUNOFF |
90 |
1 |
|
Planetary boundary layer
regime |
PBL REGIME |
220 |
1 |
|
Maximum 2m temperature |
MAX SHELTER TEMP |
15 |
105 |
|
Minimum 2m temperature |
MIN SHELTER TEMP |
16 |
105 |
|
Maximum 2m RH |
MAX SHELTER RH |
218 |
105 |
|
Minimum 2m RH |
MIN SHELTER RH |
217 |
105 |
|
Ice thickness |
ICE THICKNESS |
92 |
1 |
|
Shortwave tendency on
pressure surface |
SW TNDY ON P SFCS |
250 |
100 |
|
Longwave tendency on
pressure surface |
LW TNDY ON P SFCS |
251 |
100 |
|
Deep convective tendency on
pressure surface |
D CNVCT TNDY ON P SF |
242 |
100 |
|
Shallow convective tendency
on pressure surface |
S CNVCT TNDY ON P SF |
244 |
100 |
|
Grid scale tendency on
pressure surface |
GRDSCL TNDY ON P SFC |
241 |
100 |
|
|
VDIFF MOIS ON P SFCS |
249 |
100 |
|
Deep convective moisture on
pressure surface |
D CNVCT MOIS ON P SF |
243 |
100 |
|
Shallow convective moisture
on pressure surface |
S CNVCT MOIS ON P SF |
245 |
100 |
|
Ozone tendency on pressure
surface |
OZONE TNDY ON P SFCS |
188 |
100 |
|
Mass weighted potential
vorticity |
MASS WEIGHTED PV |
139 |
100 |
|
Simulated GOES 12 channel 3
brightness count |
GOES BRIGHTNESS-CH 3 |
221 |
8 |
|
Simulated GOES 12 channel 4
brightness count |
GOES BRIGHTNESS-CH 4 |
222 |
8 |
|
Omega on theta surface |
OMEGA ON THETA SFCS |
39 |
113 |
|
Mixing height |
MIXHT HEIGHT |
67 |
1 |
|
Average clear-sky incoming
longwave at surface |
AVE CLR INC SFC LW |
163 |
1 |
|
Average clear-sky incoming
shortwave at surface |
AVE CLR INC SFC SW |
161 |
1 |
|
Average clear-sky outgoing
longwave at surface |
AVE CLR OUT SFC LW |
162 |
1 |
|
Average clear-sky outgoing
longwave at top of atmosphere |
AVE CLR OUT TOA LW |
162 |
8 |
|
Average clear-sky outgoing
shortwave at surface |
AVE CLR OUT SFC SW |
160 |
1 |
|
Average clear-sky outgoing
shortwave at top of atmosphere |
AVE CLR OUT TOA SW |
160 |
8 |
|
Average incoming shortwave
at top of atmosphere |
AVE INC TOA SW |
204 |
8 |
|
Tranport wind u component |
TRANSPORT U WIND |
33 |
220 |
|
Transport wind v component |
TRANSPORT V WIND |
34 |
220 |
|
Sunshine duration |
SUNSHINE DURATION |
191 |
1 |
|
Field capacity |
FIELD CAPACITY |
220 |
1 |
|
ICAO height at maximum wind
level |
ICAO HGHT MAX WIND |
5 |
6 |
|
ICAO height at tropopause |
ICAO HGHT AT TROP |
5 |
7 |
|
Radar echo top |
RADAR ECHO TOP |
240 |
200 |
|
Time averaged surface
Visible beam downward solar flux |
AVE IN SFC VIS SW BE |
166 |
1 |
|
Time averaged surface
Visible diffuse downward solar flux |
AVE IN SFC VIS SW DF |
167 |
1 |
|
Time averaged surface Near
IR beam downward solar flux |
AVE IN SFC IR SW BE |
168 |
1 |
|
Time averaged surface Near
IR diffuse downward solar flux |
AVE IN SFC IR SW DF |
169 |
1 |
|
Average snowfall rate |
AVE SNOWFALL RATE |
64 |
1 |
|
Dust 1 on pressure surface |
DUST 1 ON P SFCS |
240 |
100 |
|
Dust 2 on pressure surface |
DUST 2 ON P SFCS |
241 |
100 |
|
Dust 3 on pressure surface |
DUST 3 ON P SFCS |
242 |
100 |
|
Dust 4 on pressure surface |
DUST 4 ON P SFCS |
243 |
100 |
|
Dust 5 on pressure surface |
DUST 5 ON P SFCS |
244 |
100 |
|
Equilibrium level height |
EQUIL LEVEL HEIGHT |
7 |
247 |
|
Lightning |
LIGHTNING |
187 |
1 |
|
Goes west channel 2
brightness temperature |
GOES W TB – CH 2 |
241 |
8 |
|
Goes west channel 3
brightness temperature |
GOES W TB – CH 3 |
242 |
8 |
|
Goes west channel 4
brightness temperature |
GOES W TB – CH 4 |
243 |
8 |
|
Goes west channel 5 brightness
temperature |
GOES W TB – CH 5 |
244 |
8 |
|
In flight icing from NCAR’s
algorithm |
NCAR IN-FLIGHT ICING |
168 |
100 |
|
Specific humidity at flight
levels |
SPE HUM AT FD HEIGHT |
51 |
103 |
|
Virtual temperature based
convective available potential energy |
TV CNVCT AVBL POT EN |
202 |
1 |
|
Virtual temperature based
convective inhibition |
TV CNVCT INHIBITION |
201 |
1 |
|
Ventilation rate |
VENTILATION RATE |
241 |
220 |
|
Haines index |
HAINES INDEX |
250 |
1 |
|
Simulated GOES 12 channel 2
brightness temperature with satellite angle correction |
GOESE TB-2 NON NADIR |
213 |
8 |
|
Simulated GOES 12 channel 3
brightness temperature with satellite angle correction |
GOESE TB-3 NON NADIR |
214 |
8 |
|
Simulated GOES 12 channel 4
brightness temperature with satellite angle correction |
GOESE TB-4 NON NADIR |
215 |
8 |
|
Simulated GOES 12 channel 5
brightness temperature with satellite angle correction |
GOESE TB-5 NON NADIR |
216 |
8 |
|
Simulated GOES 11 channel 2
brightness temperature with satellite angle correction |
GOESW TB-2 NON NADIR |
241 |
8 |
|
Simulated GOES 11 channel 3
brightness temperature with satellite angle correction |
GOESW TB-3 NON NADIR |
242 |
8 |
|
Simulated GOES 11 channel 4
brightness temperature with satellite angle correction |
GOESW TB-4 NON NADIR |
243 |
8 |
|
Simulated GOES 11 channel 5
brightness temperature with satellite angle correction |
GOESW TB-5 NON NADIR |
244 |
8 |
|
Pressure at flight levels |
PRESS AT FD HEIGHTS |
1 |
103 |
|
Simulated AMSR-E channel 9
brightness temperature |
AMSRE TB – CH 9 |
176 |
8 |
|
Simulated AMSR-E channel 10
brightness temperature |
AMSRE TB – CH 10 |
177 |
8 |
|
Simulated AMSR-E channel 11
brightness temperature |
AMSRE TB – CH 11 |
178 |
8 |
|
Simulated AMSR-E channel 12
brightness temperature |
AMSRE TB – CH 12 |
179 |
8 |
|
SSMI channel 4 brightness
temperature |
SSMI TB – CH 4 |
176 |
8 |
|
SSMI channel 5 brightness
temperature |
SSMI TB – CH 5 |
177 |
8 |
|
SSMI channel 6 brightness
temperature |
SSMI TB – CH 6 |
178 |
8 |
|
SSMI channel 7 brightness
temperature |
SSMI TB – CH 7 |
179 |
8 |
|
Time-averaged percentage
snow cover |
TIME AVG PCT SNW CVR |
238 |
1 |
|
Time-averaged surface
pressure |
TIME AVG SFC PRESS |
1 |
1 |
|
Time-averaged 10m
temperature |
TIME AVG TMP AT 10M |
11 |
105 |
|
Time-averaged mass exchange
coefficient |
TAVG MASS EXCH COEF |
185 |
1 |
|
Time-averaged wind exchange
coefficient |
TAVG WIND EXCH COEF |
186 |
1 |
|
Temperature at 10m |
TEMP AT 10 M |
11 |
105 |
|
Maximum U-component wind at
10m |
U COMP MAX 10 M WIND |
253 |
105 |
|
Maximum V-component wind at
10m |
V COMP MAX 10 M WIND |
254 |
105 |
VAPOR
VAPOR is the Visualization and Analysis Platform for Ocean, Atmosphere, and Solar Researchers. VAPOR was developed at NCAR to provide interactive visualization and analysis of numerically simulated fluid dynamics. The current (2.1) version of VAPOR has many capabilities for 3D visualization of WRF-ARW simulation output, including the ability to directly import wrfout files, and support for calculating derived variables that are useful in visualizing WRF output.
Basic capabilities of VAPOR with WRF-ARW output
·
Direct
Volume rendering (DVR)
Any 3D variable in the WRF data can
be viewed as a density. Users control
transparency and color to view temperature, water vapor, clouds, etc. in 3D.
·
Flow
- Display barbs associated with 2D or 3D field magnitudes. Barbs can also be positioned at a specified height above the terrain and aligned to the WRF data grid.
- Draw 2D and 3D streamlines and flow arrows, showing the wind motion and direction, and how wind changes in time.
- Path tracing (unsteady flow) enables visualization of trajectories that particles take over time. Users control when and where the particles are released.
- Flow images (image based flow visualization) can be used to provide an
animated view of wind motion in a planar section, positioned anywhere in the
scene.
- Field line advection can be used to animate the motion of streamlines
of any vector field in a moving wind field.
· Isosurfaces
The isosurfaces of variables are
displayed interactively. Users can
control iso-values, color and transparency of the isosurfaces. Isosurfaces can be colored according to the
values of another variable.
·
Contour
planes and Probes
3D variables can be intersected
with arbitrarily oriented planes.
Contour planes can be interactively positioned. Users can interactively pinpoint the values
of a variable and establish seed points for flow integration. Wind and other vector fields can be animated
in the probe plane.
· Two-dimensional variable visualization
2D (horizontal) WRF variables can be color-mapped and visualized in the
3D scene. They can be viewed on a
horizontal plane in the scene, or mapped onto the terrain surface.
· Animation
Control the time-stepping of the
data, for interactive replaying and for recording animated sequences.
·
Image
display
Tiff images can be displayed in the 3D scene. If the images are
georeferenced (i.e. geotiffs) then they can be automatically positioned at the
correct latitude/longitude coordinates. Images can be mapped to the terrain
surface, or aligned to an axis-aligned plane. Several useful georeferenced
images are preinstalled with VAPOR, including political boundary maps, and the
NASA Blue Marble earth image. VAPOR also
provides several utilities for obtaining geo-referenced images from the Web.
Images with transparency can be overlayed, enabling combining multiple layers
of information.
·
Analysis capabilities
VAPOR 2.1 has an embedded Python calculation engine. Derived variables can be easily calculated with Python expressions or programs and these will be evaluated as needed for use in visualization. VAPOR provides Python scripts to calculate the following variables from WRF output:
CTT: Cloud-top temperature
DBZ: 3D radar reflectivity
DBZ_MAX: radar reflectivity over vertical column
ETH: equivalent potential temperature
RH: relative humidity
PV: potential vorticity
SHEAR: horizontal wind hear
SLP: 2D sea-level pressure
TD: dewpoint temperature
TK: temperature in degrees Kelvin
Instructions for calculating and visualizing these and other variables are provided in the document: “Using Python with VAPOR”, at http://www.vapor.ucar.edu/docs/usage/index.php?id=python.
Derived variables can also be calculated in IDL and imported into the current visualization session. Variables can also be calculated in other languages (e.g. NCL) and adjoined to the Vapor Data Collection. Documentation of these capabilities can be found in the Documentation menu on the VAPOR website http://www.vapor.ucar.edu.
VAPOR requirements
VAPOR is supported on Linux, Mac, and Windows systems. VAPOR
works best with a recent graphics card (say 1-2 years old). The advanced features of VAPOR perform best
with nVidiaä,
ATIä
or AMDä
graphics accelerators.
VAPOR is installed on NCAR visualization systems. Users with UCAR accounts can connect their (Windows, Linux or Mac) desktops to the NCAR visualization systems using NCAR’s VNC-based remote visualization services, to run VAPOR and visualize the results remotely. Instructions for using this are at:
http://www.cisl.ucar.edu/hss/dasg/index.php?id=docs/remote-vis
Contact dasg@ucar.edu
for assistance.
VAPOR support resources
The VAPOR website: http://www.vapor.ucar.edu includes
software, documentation, example data, and links to other resources. The
document "Getting started with VAPOR
and WRF" (http://www.vapor.ucar.edu/docs/usage/index.php?id=wrfstart)
has an overview of the various documents that are useful in visualizing WRF
data with VAPOR.
The VAPOR sourceforge website (http://sourceforge.net/projects/vapor)
enables users to post bugs, request features, download software, etc.
Users of VAPOR on NCAR visualization systems should contact dasg@ucar.edu
for support.
Users are encouraged to provide feedback. Questions, problems, bugs etc. should be reported to vapor@ucar.edu. The VAPOR development priorities are set by users as well as by the VAPOR steering committee, a group of turbulence researchers who are interested in improving the ability to analyze and visualize time-varying simulation results. Post a feature request to the VAPOR SourceForge website (http://sourceforge.net/projects/vapor), or e-mail vapor@ucar.edu if you have requests or suggestions about improving VAPOR capabilities.
Basic steps for using VAPOR to visualize WRF-ARW data
1. Install VAPOR
VAPOR installers for Windows, Macintosh and Linux are available on the VAPOR home page, http://www.vapor.ucar.edu/.
For most users, a binary
installation is fine. Installation instructions are also provided in the
VAPOR documentation pages, http://www.vapor.ucar.edu/docs/install.
After VAPOR is installed, it is necessary to perform user environment setup on Unix or Mac, before executing any VAPOR software. These setup instructions are provided on the VAPOR binary install documentation pages, http://www.vapor.ucar.edu/docs/install.
2. (Optional) Convert WRF output data to VAPOR
Data Collection
Starting with VAPOR 2.0, you can directly load WRF-ARW output files into VAPOR. From the VAPOR menu, select “Import WRF-ARW output files…”. Alternately, if your data is very large, you will be able to visualize it more interactively by converting it to a Vapor Data Collection (VDC).
A VAPOR VDC consists of (1) a
metadata file (file type .vdf) that describes an entire VAPOR data collection,
and (2) a directory of multi-resolution data files where the actual data is
stored. The metadata file is created by
the command wrfvdfcreate, and the
multi-resolution data files are written by the command wrf2vdf. The simplest way to
create a VAPOR data collection is as follows:
First issue the command:
wrfvdfcreate
wrf_files metadata_file.vdf
where: wrf_files is a list of one or more wrf output files that you want to use.
metadata_file.vdf is the name that you will use for your metadata file.
For example, if the entire data is in one wrfout d02 file one could issue the following command to create the metadata file "wrfout.vdf"::
wrfvdfcreate
wrfout_d02_2006-10-25_18_00_00 wrfout.vdf
Then, to actually convert the data, issue the command:
wrf2vdf
metadata_file.vdf wrf_files
using the same arguments (in reversed order) as you used with wrfvdfcreate. Note that wrf2vdf does most of the work, and may take a few minutes to convert a large WRF dataset.
After issuing the above commands, all of the 2D and 3D variables on the spatial grid in the specified WRF output files will be converted, for all the time steps in the files. If you desire more control over the conversion process, there are many additional options that you can provide to wrfvdfcreate and wrf2vdf. Type the command with the argument “-help” to get a short-listing of the command usage. All data conversion options are detailed in section 1 of the VAPOR/WRF Data and Image Preparation Guide (http://www.vapor.ucar.edu/docs/usage/index.php?id=wrfprep). Some of the options include:
- Overriding default volume dimensions and/or spatial extents.
- Converting only a subset of the WRF output time steps
- Converting a specific collection of variables.
1. Visualize the WRF data
From the command line, issue the command “vaporgui”, or double-click the VAPOR desktop icon (on Windows or Mac). This will launch the VAPOR user interface.
To directly import WRF-ARW (NetCDF) output files, click on the Data menu, and select “Import WRF output files into default session”. Then select all the wrfout files you want to visualize and click “open”. If instead you converted your data to a VAPOR Data Collection, then, from the Data menu, choose “Load a dataset into default session”, and select the metadata file that you associated with your converted WRF data.
To visualize the data, select a renderer tab (DVR, Iso, Flow, 2D, Image, Barbs, or Probe), chose the variable(s) to display, and then, at the top of the tab, check the box labeled “Instance:1”, to enable the renderer. For example, the above top image combines volume, flow and isosurface visualization with a terrain image. The bottom image illustrates hurricane Ike, as it made landfall in 2008. The Texas terrain has a map of US Counties applied to it, and an NCL image of accumulated rainfall is shown at ground level in the current region.
2. Read
the VAPOR Documentation
For a quick overview of capabilities of VAPOR with WRF data, see “Getting
started with VAPOR and WRF,” http://www.vapor.ucar.edu/docs/usage/index.php?id=wrfstart.
A short tutorial, showing how to use VAPOR to visualize hurricane Katrina
wrfout files, is provided at http://docs.vapor.ucar.edu/tutorials/hurricane-katrina
.
Additional documents on the VAPOR website (http://www.vapor.ucar.edu) provide more information about visualization of WRF data. Information is also available in the VAPOR user interface to help users quickly get the information they need, and showing how to obtain the most useful visualizations. Note the following resources:
-The Georgia Weather Case Study (http://www.vapor.ucar.edu/docs/tutorial/index.php?id=georgia) provides a step-by-step tutorial, showing how to use most of the VAPOR features that are useful in WRF visualization.
- Conversion of WRF data and
creation of georeferenced images are discussed in the VAPOR/WRF Data and Image Preparation Guide. (http://www.vapor.ucar.edu/docs/usage/index.php?id=wrfprep)
- "Using NCL with VAPOR to visualize WRF-ARW data" (http://www.ncl.ucar.edu/Applications/wrfvapor.shtml)
is a tutorial that shows how to create georeferenced images from NCL plots, and
to insert them in VAPOR scenes.
- Fuller documentation of the capabilities
of the VAPOR user interface is provided in the VAPOR User Interface Reference Manual (http://www.vapor.ucar.edu/docs/reference/index.php?id=UIref).
- The VAPOR Users' Guide for WRF Typhoon Research (http://www.vapor.ucar.edu/docs/tutorial/index.php?id=typhoon)
provides a tutorial for using VAPOR on typhoon data, including instructions for
preparing satellites images and NCL plots to display in the scene..
-
To understand the meaning or function
of an element in the VAPOR user interface:
Tool tips: Place the cursor over a widget for a couple of seconds
and a one-sentence description is provided.
Context-sensitive help: From the Help menu, click on “?Explain
This”, and then click with the left mouse button on a gui element, to obtain a
longer technical explanation of the functionality.