| Running WRF on an AWS Instance
If you are already logged into your AWS account, and your instance is already running, proceed to step 5. Otherwise, proceed below, starting with step 1.
- Logging into the AWS System
- Click WRFDA Tutorial on AWS in a browser window. You will see AWS Log-in interface below
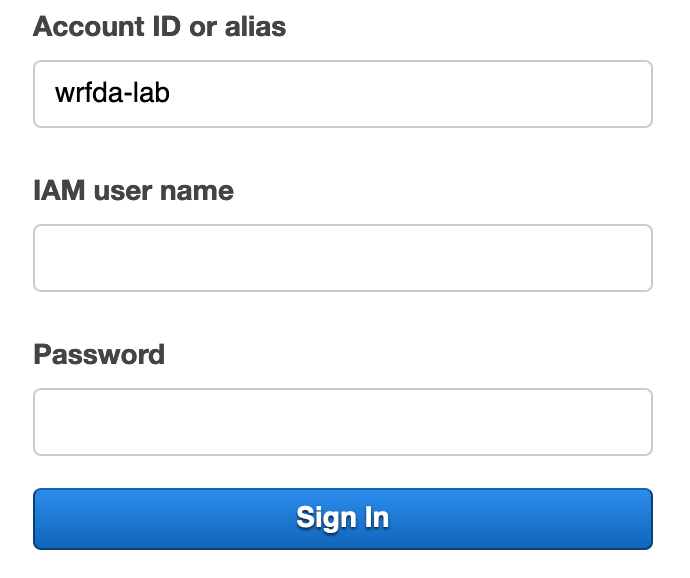
- enter in the user name and password that have been provided to you
- You should now be logged into the AWS system!
- Verifying the Region
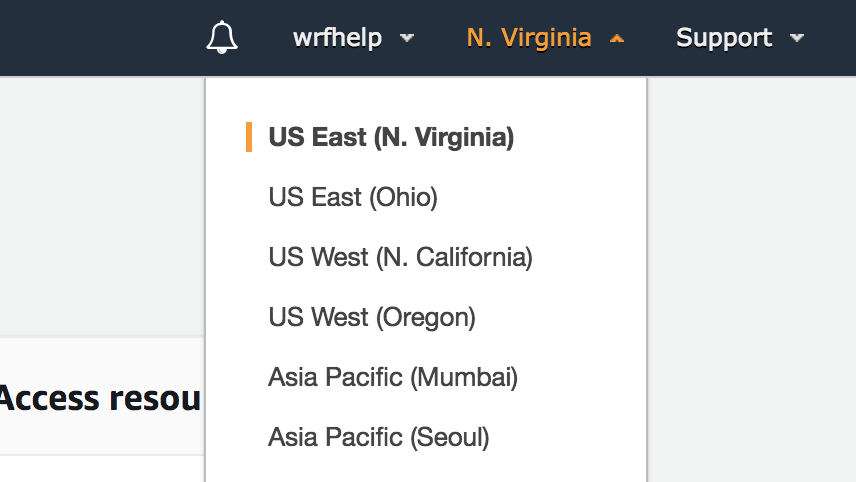
Verify that you are working in the N. Virginia region, and if not, use the drop-down box to change it.
Note: You may need to scroll to the right on your browser page to see this.
- Navigating to Amazon's Elastic Compute Cloud Web Service
Under the "Services" tab at the top, Under "Compute", click on "EC2".
- Navigating to Instances
- On the left side bar, click "Instances", located in the INSTANCES section.
- You should see all the available instances. Find the instance that has been assigned to you (e.g., class102, class103, etc.) and click the square to the left of it to highlight it (blue).

DOUBLE CHECK that you are actually choosing YOUR instance! You don't want to accidentally override someone else's work.
|
Click on the "Actions" tab at the top -> Instance State -> Start (if already started and running, you are OK).
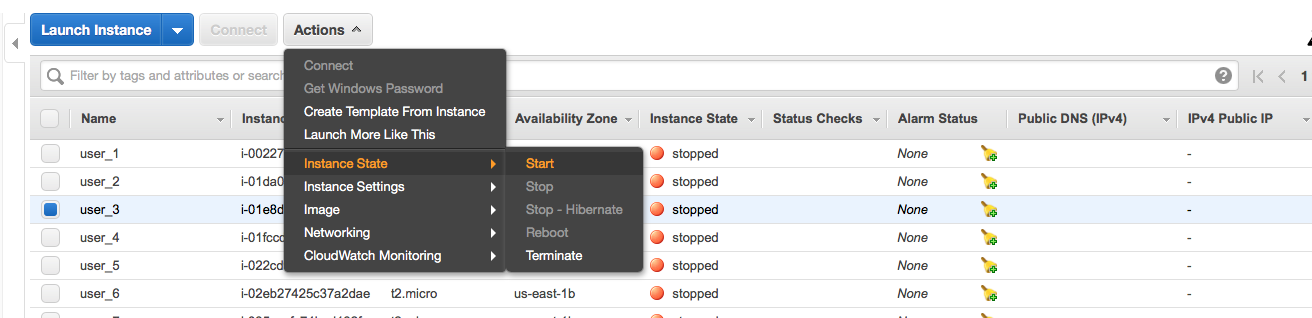
- Note: You may need to scroll down to find the one that matches your assigned log-in.
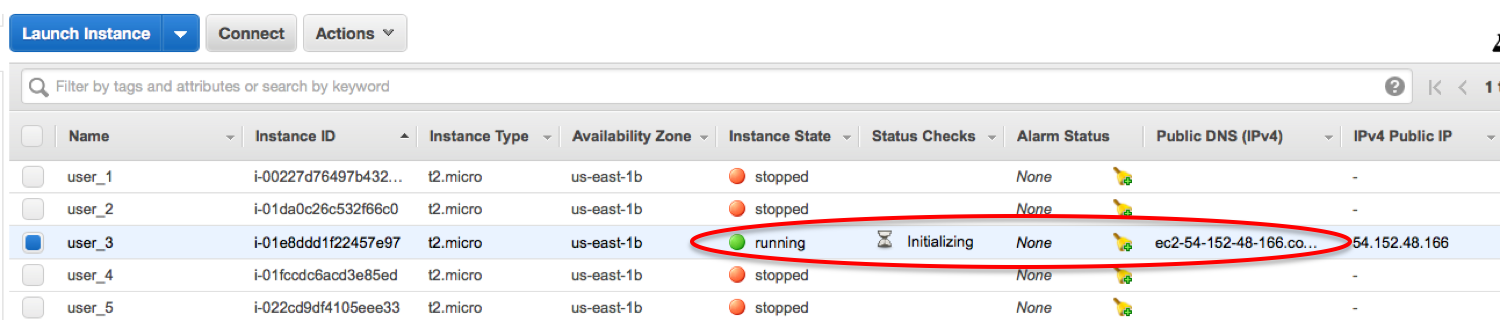
- It may take a couple of minutes for your instance to be ready. As soon as you see a green dot and "Running" under the "Instance State" column (and there is an IP address present in the "IPv4 Public IP" column), your instance is ready to use!
- Logging-in to Your Instance From Terminal Window
- On your computer, open a terminal window and from your home directory, create a directory called "aws_cloud.":
mkdir aws_cloud
- You will then need to copy an ssh key pair (tut_users_keypair.pem) to your new directory, and then modify the permissions. A key pair is an ssh key that allows access to the instance from your local machine.
cd aws_cloud
cp /classroom/WRFDA/tut_users_keypair.pem .
chmod 600 tut_users_keypair.pem
This ssh key pair file will allow access to the instance from your local computer.
- Now you can ssh into your instance:
ssh -X -i tut_users_keypair.pem ec2-user@IPV4_public_IP
on Mac, use: ssh -Y -i tut_users_keypair.pem ec2-user@IPV4_public_IP
**Note: Enter the line above EXACTLY as is indicated, except for the "IPV4_public_IP". You will need to obtain your IPV4 Public IP from the AWS "Active Instances" web page (as is shown below in 2 locations - you may need to scroll to the right on your browswer to see this.)

The IPV4 Public IP is something that is unique to your particular instance, and each time you stop/re-start your instance, this will be different, so you'll need to look for this again next time you log in.
From this point on, you'll mostly be working in your terminal window. You may occasionally need to look back at your AWS web page, so make sure to keep that open on your desktop!
ONE MORE IMPORTANT THING TO NOTE:
At the end of each class session, we will need to 'stop' (but not 'terminate') your instance so that our group doesn't continue to get charged when nothing is actually being run. You will be able to start the instance back up during the next class session. We will allow time for runs to finish before stopping everyone's instance, but if you think you need additional time, please come talk to us.
- Your Instance Environment
- Once you are in your instance from the terminal window, you should see the following set-up:
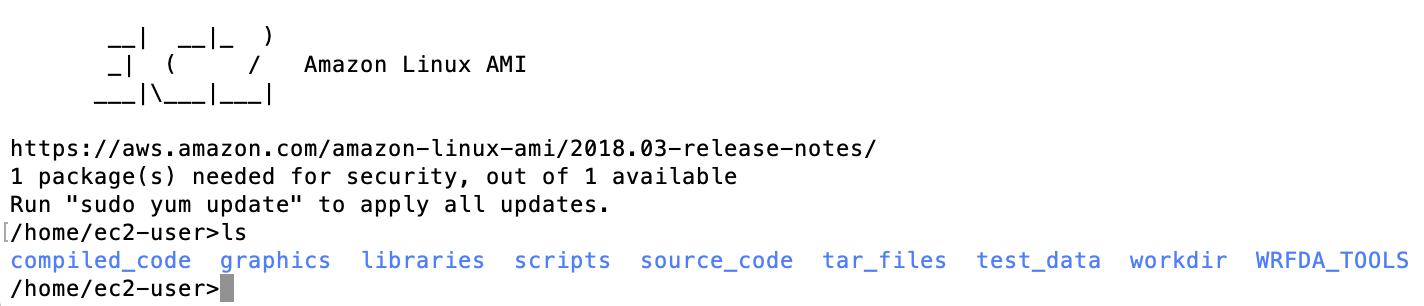
- Because this is a pre-configured image, the environment has been set up with accessible libraries, and all the code has been precompiled for you. Below is a description of the files/directories:
graphics: A directory in which you will find the NCAR–supported graphics (precompiled, from WRF Tutorial)
test_data: A directory that contains sub–directories that hold all of the input data you will use for running WRFDA cases.
libraries: These are all the installed libraries that were necessary to build WRF/WRFPLUS/WRFDA on this system. You shouldn't need to do anything in this directory.
workdir: This is the primary directory where you will run all of the cases.
scripts: A directory that contains various scripts that are used in this instance and environment. These may or may not be useful to you at some point throughout the exercises.
tar_files: A directory that contains several tar files that were scp'd into the environment. From here you can find tar files for the raw source code, as well as for the precompiled code, so if you happen to need a clean version, you can copy it from here and then unpack it.
WRFDA_TOOLS: A directory that contains WRFDA's ncl plotting scripts.
source_code: A directory that contains WRF source code.
compiled_code: A directory that contains precompiled WRF/WRFPLUS/WRFDA executable.
Notes:
- If at any time you prefer to have more than one terminal window open to your instance, that is perfectly fine. Simply ssh into the instance from multiple terminal windows to achieve this.
- If at any time you wish to move files from your instance to your local home directory, or from your local home directory to your instance, just follow these steps:
- IF you are transferring multiple files at a time, first you will need to package the files into a single .tar file.
tar -cf my_files.tar my_files*
- Now make sure you are in the terminal window for your local machine, and into your "aws_cloud" directory:
cd aws_cloud
- To copy files FROM your instance TO your local machine:
scp -i tut_users_keypair.pem ec2-user@your_IPV4_public_IP:/home/ec2-user/path_to_your_tar_file/my_file.tar .
- To copy files FROM your local machine TO your instance:
scp -i tut_users_keypair.pem path_to_your_tar_file/my_file.tar ec2-user@your_IPV4_public_IP:/home/ec2-user/path_to_where_you_want_to_put_tar_file
You are now ready to begin running the practice exercises!
|
