 Set-up and Run a Full Case from Beginning to End Set-up and Run a Full Case from Beginning to End
This exercise gives the opportunity to go through the entire set-up and run process for WPS and WRFV3. Instead of us dictating how you should set up your case, this allows you to play around with domains and to be creative. We realize that for your research you may want to run a very high resolution run, or use a large number of grid points, but we do ask that you consider doing a reduced version of that since our desktop system will not handle anything large. In other words, this exercise is only meant to cover the steps and considerations that you need when you make your own case, not the actual size of the problem.
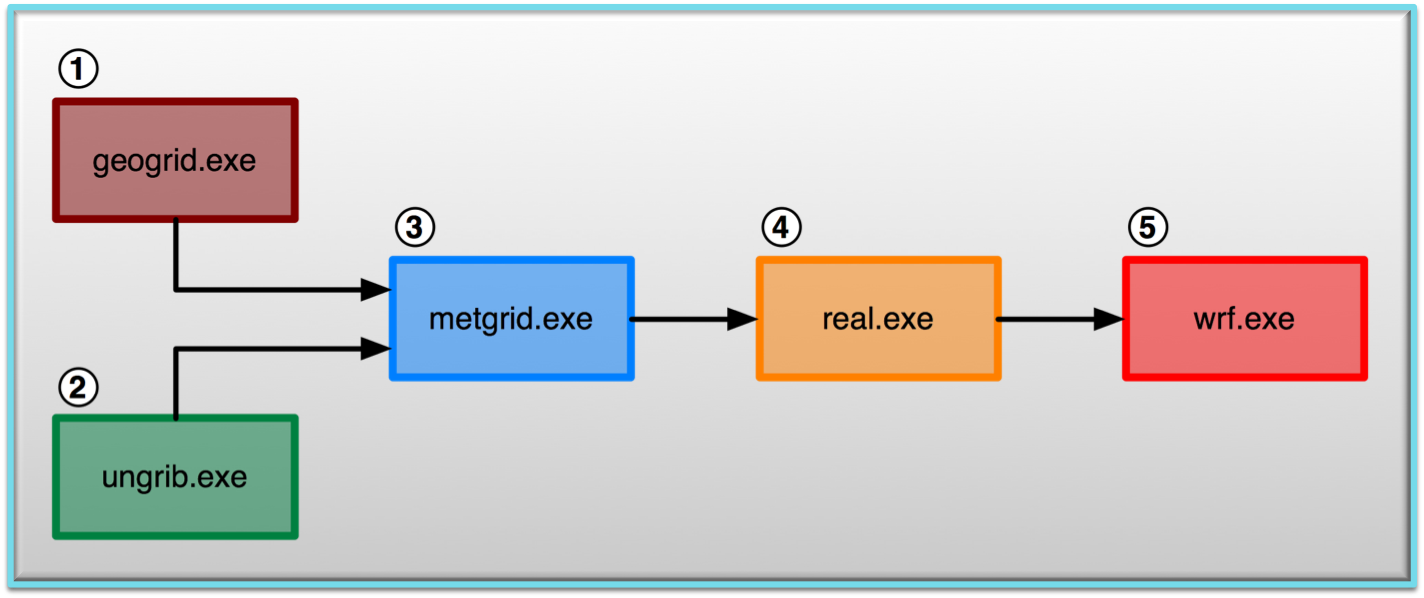
Recall that for a successful run, we need to take the 5 steps depicted below.
Note that steps 1 and 2 are independent and can be run in any order.
For steps 1 through 3, you need to be in the WPS directory. For steps 4 and 5 you need to be in the WRFV3 directory. Typically these directories will be on the same directory level.
1. Download input data
- There are several different types of data that can be used to run a case; however, for this exercise, we are going to use real-time GFS (Global Forecast System) data, provided by The National Centers for Environmental Prediction (NCEP), which is run four times daily (initializations valid for 0000, 0600, 1200, and 1800 UTC). This is a global, isobaric, 0.5 degree latitude/longitude, forecast data set that is freely available, and is usually accessible +4h after the initialization time period.
- The specific data we are going to provide is for the January 2016 U.S. East Coast Blizzard, which begins January 22, 00 UTC, and goes through January 24, 00 UTC. You can get that data from:
/kumquat/wrfhelp/DATA/Jan16_Blizzard/
-
If you are interested in obtaining different GFS data, you can read how to do so here.
- You should now have all the input files. Unpack those files in their own directory.
- For the future, you can visit this page to see other options for free input data.
1. Set-up and Run geogrid
- Make sure you are in the WPS directory.
- Edit namelist.wps to configure the simulation domain. At this point you need to decide how you want to set up your domain. Use namelist options such as 'e_we/e_sn/i_parent_start/j_parent_start/dx/dy' to configure your domain. You will also need to decide whether you are going to have any nested grids, and if so, make the appropriate namelist changes for multiple domains.
Here are some questions you might want to consider:
- Do I need to use nested domains to reach my target resolution?
- Are there any potential problems with the locations of my boundaries?
- How long will it take a typical air parcel to pass from one side of my domain to the other (consider the importance of domain size)?
- Based on other exercises that I've run, roughly how computationally expensive do I expect the domain setup to be?
Use the util/plotgrids.ncl or the 'ncview' option to view your domain. Play around with it until you have it right where you want it. If you would like to set up a nested run, set the coarse domain first. Once you are satisfied with the coarse domain, use the above-mentioned tools to outline the nest domain (i.e., to find out the starting and ending endices of the fine domain). Then you can compute the actual number of grid points in the nest domain.
Make sure that you have 'geog_data_path' pointing to where you have placed your geographical data.
NOTES:
- Read up on some basic information regarding the namelist.wps file.
-
Some basic descriptions of the namelist variables are available from the OnLine Tutorial page (geogrid ; ungrib ; metgrid)
- More detailed information is available in Chapter 3 of your ARW User's Guide
- Now Configure the model grid and generate
the geographical data file(s) "geo_em.*.nc" by running the program geogrid.exe. You should receive one file for each domain.
./geogrid.exe
2. Set-up and Run ungrib
3. Set-up and Run metgrid
Interpolate external model
data to your model grid (created by geogrid and ungrib),
and create input data for WRF by running the program metgrid.exe:
./metgrid.exe
>& log.metgrid
Note - The &metgrid section of the namelist is used for this process; however, unless you are running a special case, most likely no namelist changes are needed at this point. If you wish to read more about this section of the namelist, you can find it here.
This will create a 'met_em*' file for each time interval, and one for each domain
Set-up WRF
- Make sure you are in the WRFV3 directory.
- cd to directory: test/em_real
- Edit the namelist.input
file to reflect the domain and date information of the case you are running. Listed below are some namelist variables you should pay attention to. Feel free to also play around with different physics options (or any other options you are interested in). If you are using nested domains, make sure to fill out the values for the appropriate number of columns.
4. Run real
- Link the metgrid output data
files from WPS to the current directory:
ln
-sf ../../../WPS/met_em* .
- Run the executable real.exe (which uses the met_em* files as input)
to produce model initial and lateral boundary files:
./real.exe
If successful,
you should receive a wrfbdy_d01 file, and a wrfinput* file for each domain.
View the log files to ensure the run was successful.
5. Run wrf
- Run the executable wrf.exe
for a model simulation and forecast:
mpirun -np 8 wrf.exe
This will take a few minutes on the classroom machines.
If successful, you should receive wrfout* files. Depending on how many domains you are using, how many hours you are running, and what you have set for frames_per_outfile and history_interval will determine how many files you will have. To check whether your case ran to completion, issue the following command:
tail rsl.error.0000
Check your output:
- Check to see what is printed to the log files.
- Tail the log files and look for "SUCCESS
COMPLETE WRF".
tail rsl.out.0000
- Type the following to see output times available
in wrf history files:
ncdump
-v Times wrfout_d01_
- Try the netcdf data browser 'ncview'
to examine your wrf output file
ncview wrfout_d01_
- Generate graphics with one of the supplied packages.
If this was successful, you can continue to run another practical example.
|