This page explains how to setup and run WRF in a cluster for the purpose of using multiple node processing. If you have not yet familiarized yourself with running on a single node instance, we highly recommend doing that first.
**Click on instructions below to expand or collapse sections**
To run WRF across multiple nodes, you will need to use AWS ParallelCluster, which is a cluster management tool for deploying and managing high performance computing clusters on the AWS cloud. In order to use the tool, you must first have the following installed on your local system:
Once you have the above two programs (Python and AWS CLI) installed, follow the steps below to install the AWS ParallelCluster tool.
To install the AWS ParallelCluster tool, from your local system, open a terminal window and issue the following command:
pip install aws–parallelcluster ––user
Note: Depending on the permission settings on your machine, it may be necessary to use the "sudo" prompt at the beginning of the command (sudo pip install aws-parallelcluster).
Your system also may give an error regarding the "––user" part of the command. If so, just remove that part and try again.
To issue any commands using this tool, you will need to know the location on your local system where the "pcluster" command is located. To find it, type:
find . -name pcluster
Once you locate the path and directory, you will need to add them to your "PATH" environment variable. It is probably best to do it inside your environment script (e.g., .bashrc):
export PATH=path_to_command:$PATH
and then be sure to "source" that file after you save it. For e.g.,
source .bashrc
Additional Options
To check your version of ParallelCluster, use the command:
pcluster version
If you wish to update to the latest version of ParallelCluster, use the command:
pip install aws–parallelcluster ––upgrade ––user
To uninstall ParallelCluster, use the command:
pip uninstall aws–parallelcluster
If you run into any troubles, you can see specific installation instructions, per environment type, here:
To begin using the ParallelCluster tool to create a cluster, you will first need to create a configuration script (config). Follow the steps below to create the script.
Begin by issuing this command in the terminal window on your local system:
pcluster configure
This will give you a list of AWS regions to choose from. Choose the region in which you would like the cluster to run. Note: different regions have varying costs associated with them. Choose the region that best suits your needs and financial ability.
Next you will choose the scheduler type you would like to use for submitting your jobs.
Choose the base operating system you will be using. In the config script, this parameter will be called "base_os".
Choose the minimum and maximum size of the cluster. This is measured in number of instances. These will be called "initial_queue_size" and "max_queue_size" in the config script.
You will then need to choose your key pair. This is selected from the key pairs registered with Amazon EC2 in the selected Region. In the config script, this will be called "key_name".
Decide whether to use an existing VPC or let AWS create one for you. If you choose for AWS to create one, you then must choose whether all nodes should be in a public subnet. If you do not create one, you must choose one that already exists. You then will decide whether to use an existing subnet or create a new one. Additional information.
After this, you will have a configuration script that will be used in the next step to create your cluster. The script can be found in ~/.parallelcluster/config. The script can be modified as needed. See all configuration options.
Below is an example of a basic configuration script:
To create your cluster, begin by using this command in a terminal window on your local system:
pcluster create mycluster
Where "mycluster" is the name of your choice.
Note: The cluster name cannot have any spaces, underscores, dashes, or any other special characters.
This command will use the config script you created in the step above. This process will take a few minutes. It loops through several processes and completes each one. When it is completed, you should be given access to your command line again.
To access your cluster environment, once the create process is complete, you can issue the command (from your local machine):
where "mycluster" is the name you chose during the create process, and "my_ssh_key" is the name you have given your SSH key pair.
See the next section for information on running WRF in a cluster.
See this page for a list of all CLI commands related to AWS ParallelCluster. There are options for listing your clusters, deleting clusters, stopping/starting the cluster compute fleet, etc.
4.
You are now in the master (head) node of the cluster. This is now a simple envioronment that will need to be configured with everything you plan to use to install and run WRF.
The default shell is bash. If you wish to use a different one, you would need to install it. For e.g.,
sum yum install tcsh
tcsh
Make any modifications to the environment script (e.g., .bashrc).
You will need to build everything in the /shared directory. This is a directory that will be "visible" to all of the computer nodes. Move into /shared to install the necessary libraries, WRF, WPS, etc.
Once in the /shared directory, you can install the libraries to build WRF and WPS. Gfortran is already available on the AWS system (check by typing "which gfortran"). If you are interested in using a compiler that requires a license (e.g., Intel), you will need to build it with your license ID.
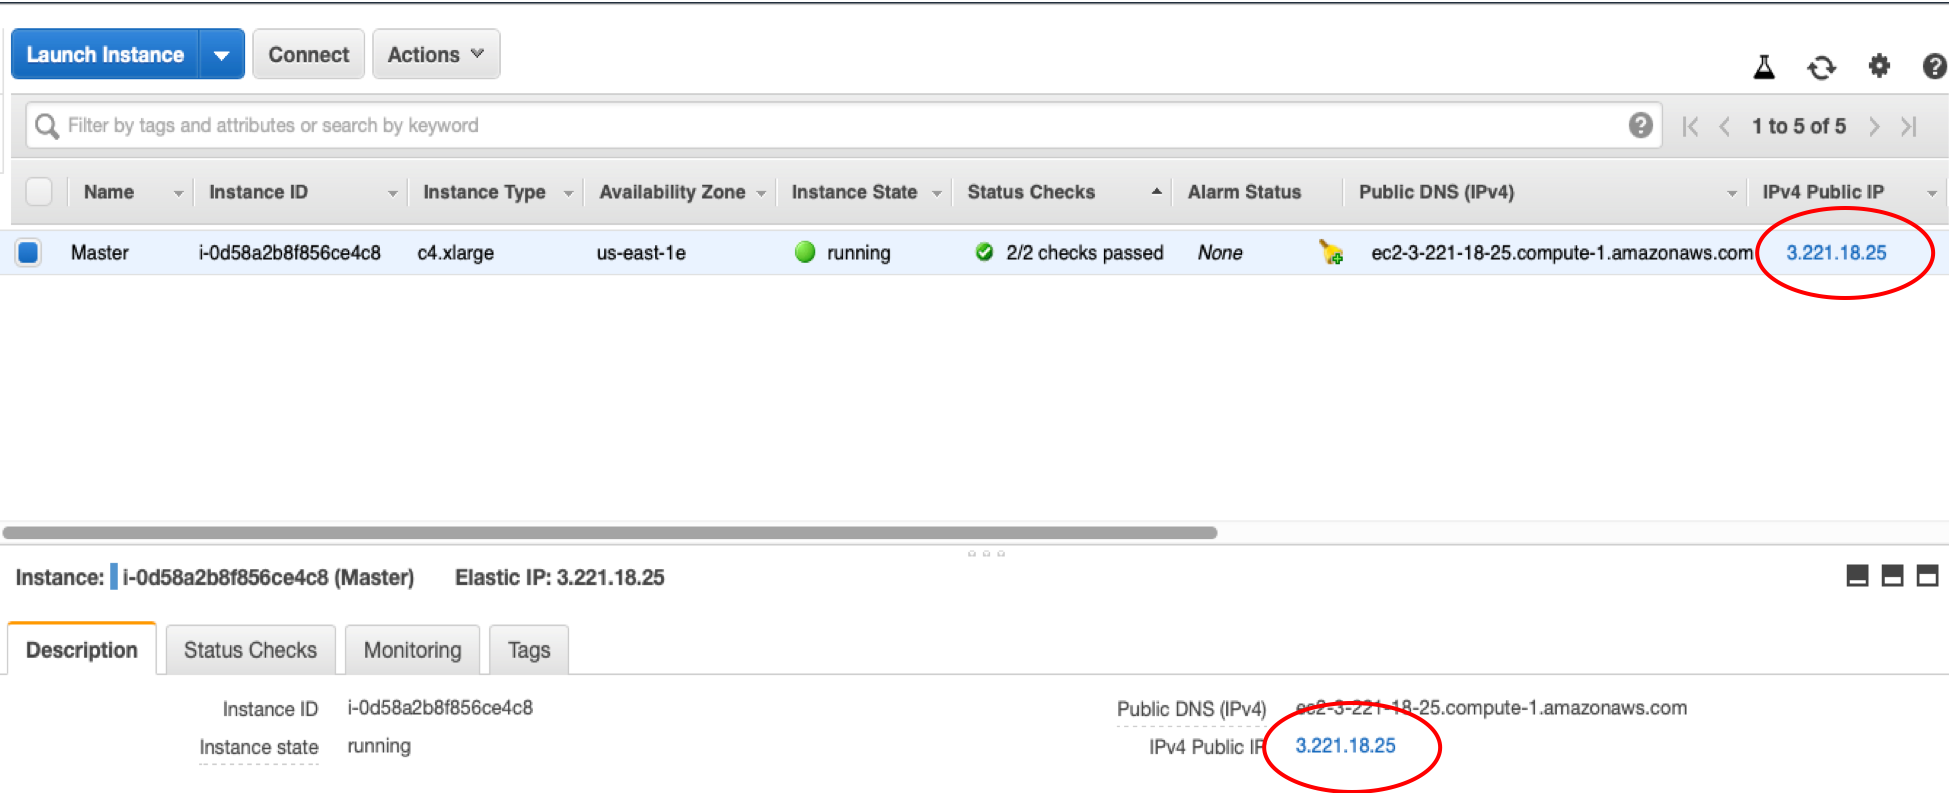
This web page will guide you through the steps for installing with gfortan, which you can loosely follow for your AWS cluster. Download the library packaged files to your local system and then use the "scp" command and the public IP address of your master node instance to send them to your remote AWS Cluster. To locate the public IP address of your master node instance,
Log into aws.amazon.com using your account log–in information.
Click the "Services" tab at the top. Under the "Compute" section, select "EC2"., and then "Instances" in the left side panel.
Look for the "Master" node instance, and locate the public IP address (example circled in red below).
Use the public IP address found in the steps above to transfer the file(s) to the home directory of your master node. From your local system, issue:
AWS platforms come available with "git" commands. You can use git to clone the WRF and WPS repositories (which are located on GitHub)to your AWS master node. From inside the /shared directory, issue:
git clone https://github.com/wrf-model/WRF.git
to obtain WRF, and to get WPS, issue:
git clone https://github.com/wrf-model/WPS.git
You can then build WRF (using dmpar) and then WPS (serial mode is fine).
5.
To obtain the full set of static fields for the geogrid program, you can access our S3 storage by issuing (from /shared):
This places the full unpacked static files in your shared directory. You will not need to issue this step again.
Use the same "scp" method as indicated in the section discussing packaged library files to transfer meteorological data to your /shared directory of your master node.
6.
You most likely compiled WPS in serial mode, and therefore after modifying your namelist, you will just run the executables from the command line, as usual. If you compiled in parallel mode, see below regarding batch submissions.
There are different schedulers supported by AWS that can be chosen during configuration. Note: The following information uses the Slurm scheduler as an example. For other options, you will need to follow commands and set–up practices specific to that scheduler.
Below is an example batch submission script (run_wrf.sh) for running wrf.exe with Slurm. Use this as a template and make necessary modifications:
In the above script, --nodes=36 means we are using 36 nodes total --ntasks-per-node means we are 3 tasks per node
with a total of 108 total tasks – hence the "108" in the mpirun command.
To run the script, from inside the WRF/test/em_real directory, issue:
sbatch run_wrf.sh
This will start the compute fleet and run wrf.exe.