 2-Way Nested Domain Example 2-Way Nested Domain Example
A 2-way nested run is a run in which multiple domains at different resolutions are run simultaneously and communicate with each other (the coarser domain provides boundary values for the nest, and the nest feeds its calculation back to the coarses domain).
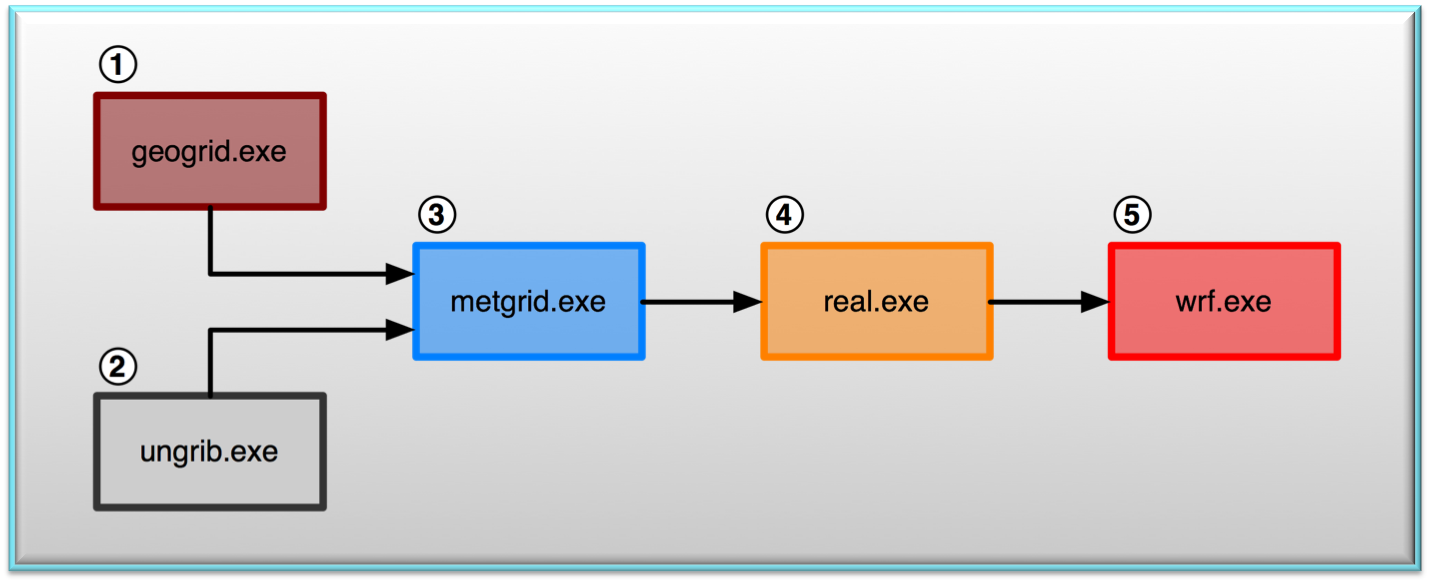
For this run we are going to have 1 coarse domain, and 1 finer-resolution domain. We will need to repeat steps 1,3,4, and 5. We do not need to repeat step 2, as we have already ungribbed the data for the Single Domain Run. If you no longer have this data, go back to the Single Domain Run and repeat step 2.
Set-up and Run geogrid
- Make sure you are in the WPS directory.
- Edit namelist.wps to configure the simulation domain.
NOTES:
- We picked a 1:3 grid ratio (which is recommended) between the first and second domains, so we have to follow the '3*x+1' rule when picking domain sizes for domain 2. Test the above grid dimensions for domain 2 to make sure they follow this rule.
- Note that not all namelist parameters have multiple column entries, as some entries do not require multiple columns.
- Read up on some basic information regarding the namelist.wps file.
-
Some basic descriptions of the namelist variables are available from the OnLine Tutorial pages (geogrid ; ungrib ; metgrid)
-
More detailed information is available in Chapter 3 of your ARW User's Guide
- Before running geogrid.exe - let us preview the domain to make sure it is correct.
- Now Configure the model grid and generate
geographical data files "geo_em.d01.nc" and "geo_em.d02.nc" by running program geogrid.exe
./geogrid.exe
Set-up and Run metgrid
Before you run metgrid.exe, make sure that the dates in namelist.wps are set correctly for DOMAIN 2.
Note - end_date for domain 2 is equal to the start date, as only the initial time is required for this domain.
Interpolate external model
data to your model grid (created by geogrid and ungrib),
and create input data for WRF by running the program metgrid.exe:
./metgrid.exe
This will create a number of files (note the single extra domain 2 file now being created):
Try the netcdf data browser 'ncview' to quickly
examine your data files from metgrid.
Set-up WRF
- Make sure you are in the WRFV3 directory.
- cd to directory test/em_real
- Edit the namelist.input
file to reflect the domain and date information of the case we are running:
- Note that some of the parameters have 2 columns now and some still only require one.
- Make sure to copy over the domain information correctly from WPS.
- dx and dy need to be accurate for domain 2 - so if dividing domain 1's dx and dy by 3 results in fractions, make sure to use at least 2 decimal places to represent the grid distance for domain 2.
- input_from_file=.true. for domain 2, indicates that we will be creating input data for domain 2.
- Read more about:
- To learn more about the namelist variables view the OnLine Tutorial page, or
- For more details, see Chapter 5 of your ARW User's Guide
Run real
- Link the metgrid output data
files from WPS to the current directory:
ln
-sf ../../../WPS/met_em* .
- Run the executable real.exe
to produce model initial and lateral boundary files:
real.exe
If successful,
the following input files for wrf will be created (Note: a wrfbdy_d02 file will not be created, as the nest will always gets its boundary conditions from the mother domain):
wrfbdy_d01
wrfinput_d01
wrfinput_d02
View the log files to ensure the run was successful.
Run wrf
- Run the executable wrf.exe
for a model simulation and forecast:
wrf.exe
Running a 24–hour simulation for this case will take a few minutes on the classroom machines.
If successful, this will
generate the following history files:
wrfout_d01_
wrfout_d01__15:00:00
wrfout_d01__18:00:00
wrfout_d01__21:00:00
wrfout_d01__00:00:00
wrfout_d01__03:00:00
wrfout_d01__06:00:00
wrfout_d01__09:00:00
wrfout_d01__12:00:00
wrfout_d02_
wrfout_d02__15:00:00
wrfout_d02__18:00:00
wrfout_d02__21:00:00
wrfout_d02__00:00:00
wrfout_d02__03:00:00
wrfout_d02__06:00:00
wrfout_d02__09:00:00
wrfout_d02__12:00:00
Check your output:
- Check to see what is printed to the log files.
- Tail the log files and look for "SUCCESS
COMPLETE WRF".
- Type the following to see output times available
in the wrf history file:
ncdump
-v Times wrfout_d01_
- Try the netcdf data browser 'ncview'
to examine your wrf output file
- Generate graphics with one of the supplied packages.
Organization Suggestion:
Recall the suggestion (from the "basic" case) to create a directory to put your files in. Do this again for this case:
mkdir two_way_nest
and then copy the necessary files into that directory to preserve them for potential later use.
If this was successful, you can continue to run another practical example.
|