Derecho HPC Log-in and Setup
Tutorial practice exercises are tailored to work on the NSF NCAR’s Derecho HPC, which includes the libraries needed by WRF and its pre- and post-processing tools through modules.
Logging-in to Derecho
Important
If issues arise during this process, you must contact NCAR’S CISL HPC User Support for assistance. WRF Tutorial instructors do not have management access to HPC accounts, and therefore cannot help.
Open a terminal window on your local system.
Note
Windows users unfamiliar with system configuration can find help in the Notes for Windows Users (though it’s AWS-specific, the information is generally helpful). Alternatively, consult a system administrator or IT staff.
Type in one of the following commands, depending on what type of system you’re using, but use your own user name instead of user. In the email from CISL, regarding setting your DUO/CIT password, you were given a new email address (username@ucar.edu). The username before the “@ucar.edu” is your user name for logging in here.
Mac-OS
ssh -Y user@derecho.hpc.ucar.edu
Windows or Linux
ssh -X user@derecho.hpc.ucar.edu
Then press the enter/return key. You should then see the following:
(user@derecho.hpc.ucar.edu) ncar-two-factor:
Type your password here (the password you set up using the emailed instructions from NSF NCAR/CISL). Note that your password will not display as you type it. This is normal. After you type it in, just hit the enter/return key.
If you have the DUO app installed on your phone, you should get a DUO notification like the following:

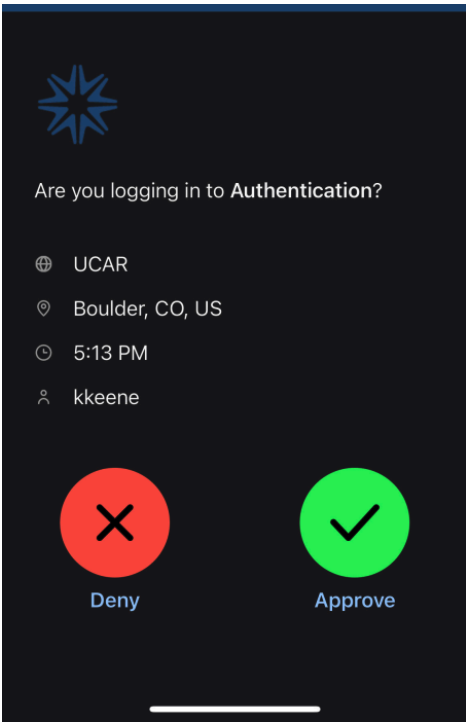
Tap on the notification to reveal a screen similar to the following.

Tap the “Approve” button and then you should be let in to the Derecho system.
Setting-up Your Derecho Environment
When you first log–in to Derecho, you will be placed in your home directory (/glade/u/home/$USER, where $USER is your CISL log-in name).
For these exercises to work properly, several environment settings must be configured beforehand. To make this easy, we’ve provided a .bashrc script that contains these settings. Simply copy this script to your home directory.
From your home directory, issue the following (don’t forget the “.” at the end to tell the copy command to place the script “here”):
cp -r /glade/campaign/mmm/wmr/wrf_tutorial/.bashrc .
“Source” the .bashrc script to implement its settings.
source .bashrc
Note
Now that you have the .bashrc file in your home directory, next time you log-in to Derecho, the settings will be automatically applied, so you will not need to do this step at any point after this.
Setting Up for Practice Exercises
All exercises must be run in your scratch directory (/glade/derecho/scratch/$USER). Unpack the provided folder into your working space to access the preconfigured directory structure for the practices.
Move into the scratch directory
cd /glade/derecho/scratch/$USER
Unpack the practices_exercises.tar file in your current directory:
tar -xf /glade/campaign/mmm/wmr/wrf_tutorial/practice_exercises.tar
This may take several minutes. Once it completes, the command line prompt will reappear in your terminal window.
Move into the practice_exercises directory
cd practice_exercises
Issuing the ls command should reveal the following directories:
troubleshooting_exercise |
Used specifically for a “Troubleshooting” exercise |
wps |
For running all WPS processes (geogrid, ungrib, and metgrid) |
wrf |
For running most of the WRF processes (real and wrf) |
wrf_ideal_dm |
For running idealized cases built for distributed-memory processing (you will learn more about this later) |
wrf_ideal_serial |
For running idealized cases built for serial processing |
wrf_vortex |
Used specifically for the vortex-following exercise |
Running Jobs on Derecho
Running jobs on Derecho requires the submission of a job script to a batch queueing system, which allocates computing resources when they become available. This tutorial will guide you through the job submission process.
The following key commands are worth noting:
|
This command submits a job script, which describes a job to be run on one or more batch nodes. |
|
This command tells you the status of your pending and running jobs. Note that you may need to wait 30 seconds to 1 minute for a recently submitted job to show up. |
|
This command deletes a queued or running job. |
Useful Tools on Derecho
Editors
To make modifications to scripts, namelists, etc., the following editors are available:
vi : only use if you are familiar with vi
emacs : only use if you are familiar with emacs
gedit : Recommended option if you are unfamiliar with vi or emacs. Note that this option is only available if you have x-forwarding installed.
The command format for using these editors is <editor name> <file name>. For e.g.,
gedit namelist.input
Viewing .pdf Files
To view a .pdf file on Derecho, use the following command:
display file.pdf
Note that this option is only available if you have x-forwarding installed.
Comparing Files
To compare two text files (for e.g., to see the differences in two different namelist files), use either diff or xxdiff. xxdiff may be more viewer-friendly for comparing numerous differences, as it displays a side-by-side view of the two files. Both commands expect the same format. For e.g.,
xxdiff path-to-file/file path-to-file/file
Note that the xxdiff option is only available if you have x-forwarding installed.
You are now ready to begin running the practice exercises!
