Run the Model for a One-way Nested Domain Using Ndown
In this section, one-way nesting is defined as a finer-grid-resolution run, made as a subsequent run after the coarser-grid-resolution run, where the ndown program is run between the two simulations. The initial and lateral boundary conditions for this finer-grid run are obtained from the coarse grid run, with input from higher resolution terrestrial fields (e.g. terrain, landuse, etc.), and masked surface fields (such as soil temperature and moisture). The program that performs this task is ndown.exe, which is available in the WRF/test/em_real directory.
This exercise will use the same severe storm outbreak over the midwest and southest United States case from the Single Domain exercise, but this time a higher-resolution nest is added after running the coarse parent domain during the Single Domain exercise. If you have not gone through the Single Domain exercise, please go back and run that case before advancing in this exercise.
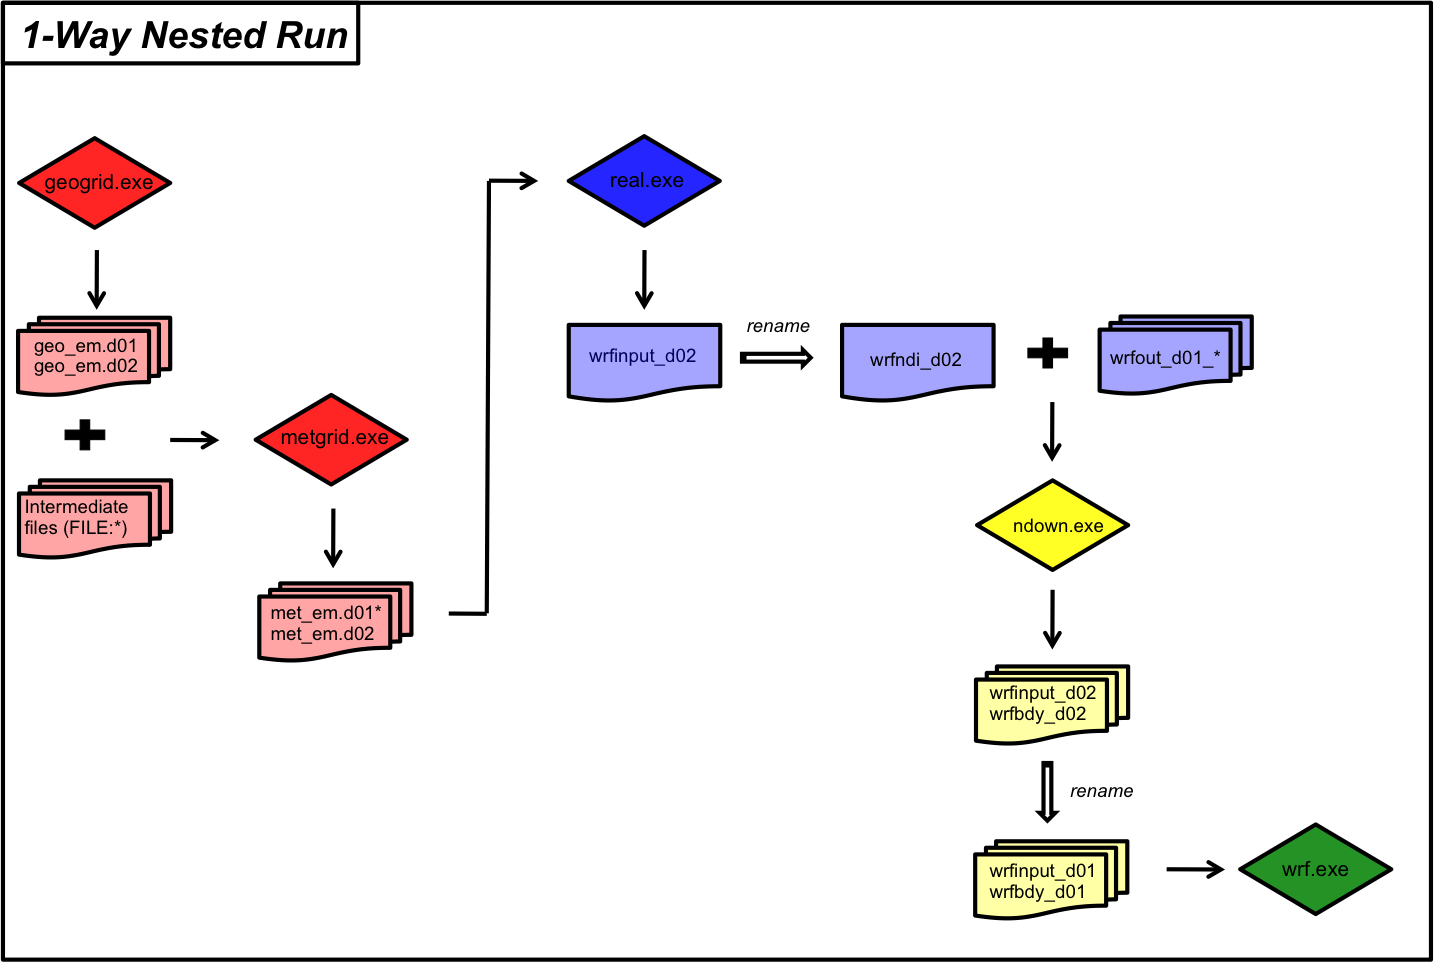
See the flow chart below for a better understanding of the order of processes for ndown. The steps are:
Run a coarse grid simulation
Run WPS for both domains
Run real.exe for both domains
Run ndown.exe for both domains
Run wrf.exe for the fine-resolution domain only
Follow the below steps to use ndown to add a finer-resolution nest to an existing coarse-resolution domain.
Run WPS for Two Domains
Note
If you ran the Two-way Nested exercise, and still have met_em files for both domains 01 and 02, then you can skip this entire section and move on Run Real for Two Domains.
The steps to run WPS for two domains are identical to the process for the Two-way Nested exercise. Go to that exercise and follow the instructions for running geogrid and metgrid for a nested case. When you reach the section for running real.exe, come back to this page and proceed to the next section.
Run Real for Two Domains
Move into the WRF/test/em_real directory.
Link the metgrid output for both d01 and d02 to the em_real directory.
ln -sf path-to-WPS/met_em* .
Edit namelist.input to ensure columns 1 and 2 are set up to run 2 domains.
Note
For the settings that are domain-dependent, there is no need to remove the settings for columns 3+, as the max_dom parameter indicates to the model that it only needs to process two domains.
See WRF Namelist Variables from the WRF Users’ Guide for details about each parameter.
See namelist.input Best Practices for additional information and suggestions.
&time_control
run_hours               = 24,
start_year              = 2023,   2023,
start_month             = 03,     03,
start_day               = 31,     31,
start_hour              = 00,     00,
end_year                = 2023,   2023,
end_month               = 04,     04,
end_day                 = 01,     01,
end_hour                = 00,     00
interval_seconds        = 21600
input_from_file         = .true.,.true.,
history_interval        = 180,    180,
frames_per_outfile      = 1,      1,
restart                 = .false.,
restart_interval        = 72000,

&domains
time_step               = 180
max_dom                 = 2,
e_we                    = 100,     118
e_sn                    = 100,     103
e_vert                  = 45,      45,
num_metgrid_levels      = 34
num_metgrid_soil_levels = 4
dx                      = 30000
dy                      = 30000
grid_id                 = 1,       2,
parent_id               = 0,       1,
i_parent_start          = 1,       36
j_parent_start          = 1,       32
parent_grid_ratio       = 1,       3,
parent_time_step_ratio  = 1,       3,
Note
Only some namelist variables require settings for both domains. If there is only a single setting for a variable in the default namelist (or in the list above), do not add another column - it will give an error when you try to run.
Run real.exe.
Depending on how WRF was installed (e.g., for serial or dmpar computation), the command to run real.exe will differ. Additionally, if using dmpar (parallel processing) on a cluster, it is possible a batch script is required to submit the command. Within that batch script, the same type of MPI command will be used. Use something similar to the following (it may be necessary to ask a systems administrator at your institution for guidance on the proper command for your machine/environment).
For parallel-processing (dmpar)
mpiexec -np X ./real.exe
The X in the above command indicates the number of processors to use. real.exe is a quick process and probably does not need a lot of processors - especially for this fairly small simulation. An appropriate number would be somewhere between ~1-50.
For serial processing (using a single processor)
./real.exe >& real.log
The error and output will go to the real.log file for serial computation, and for parallel computation, there will be an rsl.out and rsl.error file available for each processor. Check the end of those files for the “SUCCESS” message to ensure real.exe ran correctly.
If successful, the output files wrfbdy_d01, wrfinput_d01, and wrfinput_d02 will be available in the em_real directory. The only file needed for the next step (running ndown.exe) is wrfinput_d02, which is used, along with the previously-generated wrfout_d01 files to create new initial and boundary conditions for the fine-resolution domain, so that it is able to run without the coarse grid.
Run Ndown
The ndown program looks for a specific naming convention for the wrfinput_d01 file, so it must be renamed to wrfndi_d02.
mv wrfinput_d02 wrfndi_d02
In addition to wrfndi_d02, make sure the wrfout_d01 files from the Single Domain exercise are available in the test/em_real directory.
Add the following to the &time_control namelist.input record. This specifies that input stream 2 uses netCDF format.
&time_control
io_form_auxinput2 = 2
Run ndown.exe.
This executable should be run the same way real.exe was run - specific to the type of compile used.
For parallel-processing (dmpar)
mpiexec -np X ./ndown.exe
The X in the above command indicates the number of processors to use. ndown.exe is a quick process and probably does not need a lot of processors - especially for this fairly small simulation. An appropriate number would be somewhere between ~1-50.
For serial processing (using a single processor)
./ndown.exe >& ndown.log
If successful, the output from ndown.exe should be a new wrfinput_d02 file, and a wrfbdy_d02 file
Run WRF for the Fine-resolution Domain
The output files from running ndown.exe are going to be used as the new initial and boundary conditions for running the WRF fine-resolution domain, and because this domain will be run by itself, it will now represent “domain 01.” Therefore the ndown.exe output files must be renamed to be recognized as d01 files.
mv wrfinput_d02 wrfinput_d01

mv wrfbdy_d02 wrfbdy_d01
The namelist.input file used for the previous steps was set up for two domains. Now to run the fine-resolution domain as the new d01, the namelist must be modified to set several of the column 2 settings to column 1. Before doing this, it is a good idea to save the original namelist to refer back to it, if necessary.
cp namelist.input namelist.input.original
Now make the following modifications to namelist.input. Again, no need to delete columns 2 and 3. Just simply modify the settings for column 1.
&domains
 time_step  = 60
 max_dom    = 1
 e_we       = 118
 e_sn       = 103
 dx         = 10000
 dy         = 10000
Note
Note that the time_step value had to be changed to correspond with the new resolution (dx and dy). Because time_step should not be any larger than 6xDX (in km), and since dx/dy = 10000 now, time_step has been changed to 60.
When wrf.exe runs, it is going to overwrite the wrfout_d01 files. To avoid this, and to save those original files, move them to a new directory where they will not be overwritten.
mkdir saved_wrf_output
mv wrfout* saved_wrf_output
Run wrf.exe.
This executable should be run the same way real.exe was run - specific to the type of compile used, except more processors may be needed.
For parallel-processing (dmpar)
mpiexec -np X ./wrf.exe
The X in the above command indicates the number of processors to use. An appropriate number would be somewhere between ~1-50.
For serial processing (using a single processor)
./wrf.exe >& wrf.log
If successful, the output from wrf.exe should be wrfout_d01 files that are, of course, actually for the nested domain.
To look at the contents in the wrfout files, use either the netCDF ncdump utility, or the ncview tool.